
Easy Homemade Dill Pickles Recipe
If you’ve ever wanted to capture that iconic crisp, tangy, and utterly satisfying crunch of deli-style pickles right in your own kitchen, then you are in for a real treat with these Easy Homemade Dill Pickles. This recipe is an absolute game-changer for anyone craving fresh pickles that burst with bright dill flavor, garlic punch, and a perfectly balanced brine. Whether you’re an experienced home canner or a total beginner, this guide walks you through everything so you can enjoy jar after jar of your very own homemade pickle goodness.
Ingredients You’ll Need
The beauty of this recipe lies in its simplicity—the ingredients are everyday pantry essentials, and each one plays a vital role in creating that authentic pickle flavor that everyone loves. From fresh cucumbers to fragrant dill and the perfect blend of vinegar, salt, and sugar, these components come together to guarantee crisp, flavorful pickles every time.
- Cucumbers (approximately 12 pounds): Choose small, firm cucumbers with no blemishes for that perfect pickle crunch.
- Peppercorns (1/2 tablespoon): Adds pleasant subtle heat and a hint of spice to the brine.
- Garlic cloves (16 cloves): Infuses the pickles with a robust, savory depth that’s simply irresistible.
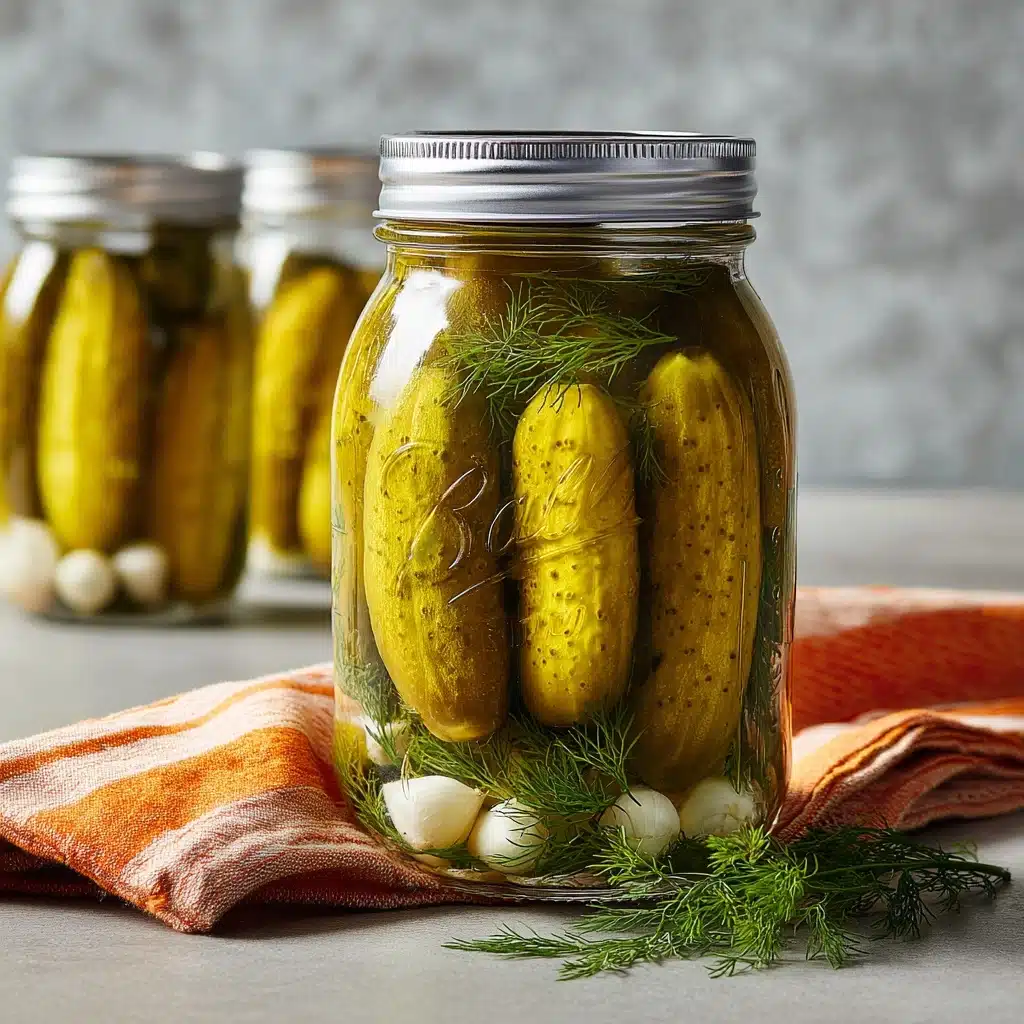
- Fresh dill (2-3 twigs per jar): The star herb that delivers that unmistakable fresh dill aroma and taste.
- Water (12 cups / 3,000 ml): Use cold or lukewarm water to help dissolve the salt and sugar evenly in the brine.
- Distilled white vinegar (2 cups / 500 ml): At 5% or 6% acidity, it adds the signature tang and aids preservation.
- Fine salt (2/3 cup / 200g): Essential for flavor balance and crisp texture—do not substitute iodized salt.
- Granulated sugar (1/2 cup + 1 tablespoon / 115g): Balances acidity with just a touch of sweetness for a well-rounded taste.
- Bay leaves (5 leaves): Provide an earthy nuance that harmonizes the pickling flavor beautifully.
How to Make Easy Homemade Dill Pickles
Step 1: Sterilize Your Jars
Cleanliness is key to making safe, delicious pickles, so start by washing your jars and lids thoroughly with warm soapy water. Then sterilize the lids by boiling them fully submerged for about 4–5 minutes once the water hits a boil. Carefully dry them with a paper towel. Next, preheat your oven to 215°F and place the jars upside down on the racks to dry completely for 20 minutes. This preparation ensures your jars are spotless and ready to preserve your pickles perfectly.
Step 2: Prepare the Pickling Brine
The brine is the heart and soul of your easy homemade dill pickles. In a large pot, combine water, distilled white vinegar, sugar, salt, and bay leaves, then bring everything up to a boil. Reduce heat and let it simmer for 5 minutes to fully dissolve the salt and sugar while infusing that subtle bay leaf flavor. Removing the bay leaves after resting the brine for 10 minutes helps ensure a pure, balanced taste.
Step 3: Pack the Jars with Cucumbers and Flavorings
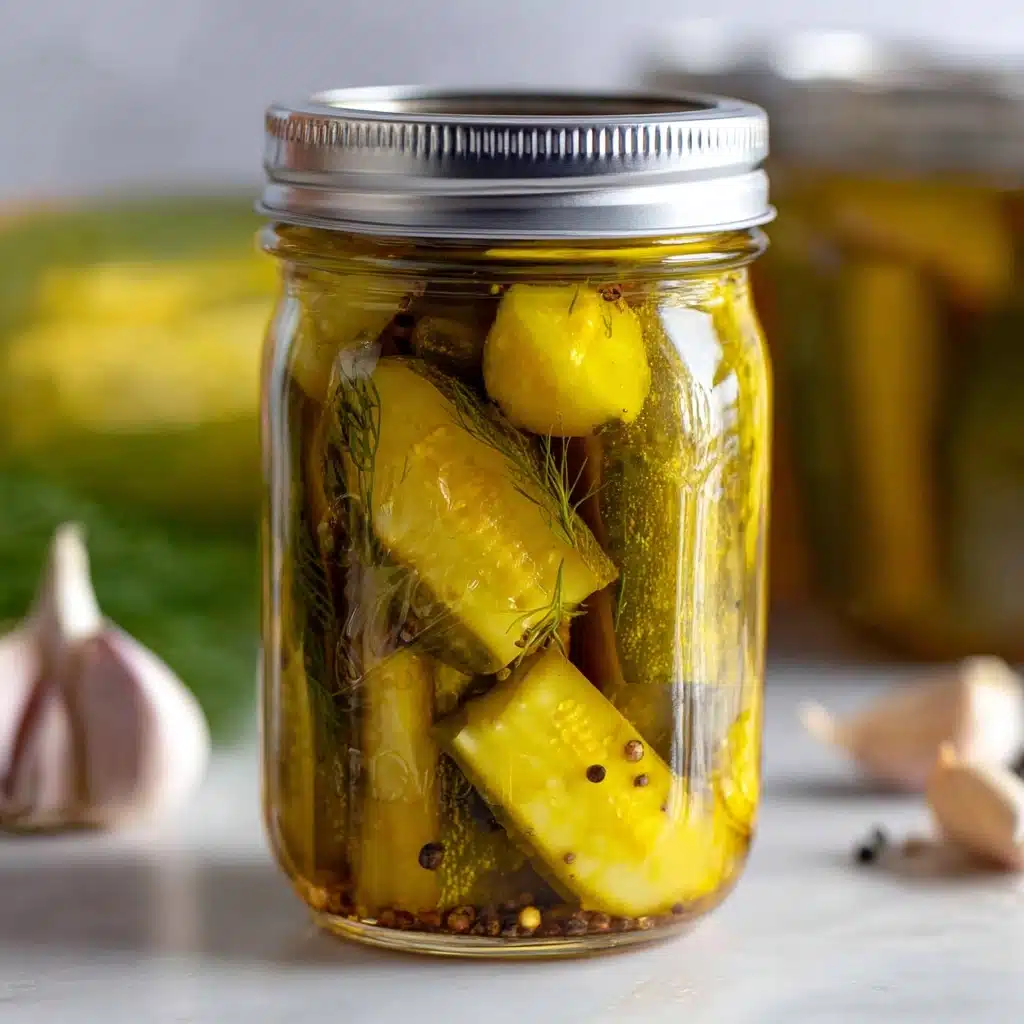
Before packing, rinse your cucumbers and slice off the ends to remove any bitterness. Into each sterilized jar, add fresh dill twigs, garlic cloves, and black peppercorns at the bottom. Then tightly pack the cucumbers, making sure there’s minimal air space for the best texture. Pour the warm brine slowly over the cucumbers, leaving just half an inch from the rim to allow for safe sealing.
Step 4: Process the Jars in Hot Water
Place a towel on the bottom of your pot to prevent direct contact between the jars and the pot, protecting the glass from cracking during boiling. Position the packed jars in the pot and fill with warm water up to about 2 inches below the rim of the jars. Cover with a lid and bring the water to a boil over medium-high heat. Once boiling, reduce heat and let the jars process for approximately 15 minutes or until the cucumbers shift to a lighter green shade, signaling they’re ready for sealing.
Step 5: Seal and Store Your Pickles
Carefully lift each jar out of the hot water using a jar lifter. Immediately screw on the lids tightly while still hot (wearing an oven mitt or using a kitchen towel to protect your hands). Flip the jars upside down and cover them with thick towels or blankets to retain heat while sealing. Let the jars rest undisturbed at room temperature for 12 to 24 hours. You might hear captivating popping sounds—that satisfying “pop” means your pickles are sealed! Store them in a cool, dark place and get ready to enjoy.
How to Serve Easy Homemade Dill Pickles
Garnishes
Adding a few sprigs of fresh dill or a sprinkle of cracked black pepper right before serving can brighten the flavor and make your homemade dill pickles look as mouthwatering as they taste. Sometimes a dash of chili flakes or a lemon wedge alongside can add a playful kick that elevates your pickled experience.
Side Dishes
Easy Homemade Dill Pickles pair perfectly with hearty sandwiches, from classic pastrami to grilled cheese or even simple deli meats. They also complement barbecue dishes, fresh burgers, and charcuterie boards delightfully. The sharp tang cuts through rich, fatty flavors wonderfully, balancing your meal.
Creative Ways to Present
Turn your pickles into an irresistible snack by slicing them into spears or rounds to add atop salads, deviled eggs, or alongside cream cheese and crackers. You can even chop them finely and mix into sauces, tartar sauce, or potato salad to inject that vibrant pickle zing everyone adores.
Make Ahead and Storage
Storing Leftovers
If you don’t finish your jar all at once, no worries! Once opened, keep your Easy Homemade Dill Pickles refrigerated. They stay crunchy and flavorful for up to 4 weeks when tightly sealed after each use.
Freezing
Freezing pickles is not recommended because it alters their crispness and texture, often making them mushy once thawed. Instead, try to consume refrigerated pickles within the suggested timeframe for best quality.
Reheating
Pickles are best enjoyed cold or at room temperature. Reheating is generally unnecessary and can diminish their satisfying crunch and fresh flavors. Simply serve them straight from the fridge or let them sit out for a few minutes before indulging.
FAQs
Can I use any cucumbers for Easy Homemade Dill Pickles?
For the best crunch, small, firm pickling cucumbers are ideal. Larger cucumbers or those with thick skins may result in softer pickles, but they can still work if you’re in a pinch.
Do I have to sterilize the jars?
Yes! Sterilizing jars and lids prevents harmful bacteria growth, ensuring your pickles stay safe and delicious during storage.
How long before the pickles are ready to eat?
While you can eat some pickles in as little as 24–48 hours, the flavor truly develops around 1 to 2 weeks after pickling.
Can I adjust the amount of garlic or dill?
Absolutely! Customize the garlic and dill to your liking, adding more for a bolder flavor or less if you prefer something milder.
What if my jars don’t seal properly?
If you don’t hear the “pop” seal sound, store those jars in the fridge and consume them within a few weeks. You can also reprocess jars with new lids to attempt sealing again.
Final Thoughts
Making your own Easy Homemade Dill Pickles is such a rewarding experience—I promise it’s worth every step. These pickles deliver that perfect combination of tangy, garlicky, and herby crunch that will elevate any meal or snack. Give this recipe a try and enjoy the pride of serving up your very own crunchy masterpieces to family and friends. Happy pickling!
“`
PrintEasy Homemade Dill Pickles Recipe
This recipe for Easy Homemade Dill Pickles guides you through making classic crunchy pickles with fresh cucumbers, garlic, dill, and a perfectly balanced pickling brine. The method includes sterilizing jars, preparing a flavorful brine with vinegar, salt, sugar, and bay leaves, and processing the jars to ensure proper preservation. These tangy, garlicky dill pickles are perfect for snacking or adding zest to your favorite dishes.
- Prep Time: 30 minutes
- Cook Time: 25 minutes
- Total Time: 55 minutes
- Yield: About 6–7 quart jars (approximately 7–8 liters of pickles) 1x
- Category: Pickles and Preserves
- Method: Boiling Water Bath Canning
- Cuisine: American
- Diet: Halal
Ingredients
Pickling Brine
- 12 cups (3,000 ml) water (cold or lukewarm)
- 2 cups (500 ml) distilled white vinegar (5% or 6% acidity)
- 2/3 cup (200 g) fine salt
- 1/2 cup + 1 tablespoon (115 g) granulated sugar
- 5 bay leaves
Pickles
- 12 pounds cucumbers (approximately), well rinsed with ends trimmed
- 16 garlic cloves (2 per jar)
- Fresh dill, 2-3 twigs per jar
- 1/2 tablespoon peppercorns (approximately 5 per jar)
Instructions
- Sterilize Jars: Wash all jars and lids with warm soapy water. Submerge lids in boiling water for 4-5 minutes, then carefully pat dry with paper towels. Preheat the oven to 215°F (about 102°C) and place jars upside down on oven racks. Dry jars in the oven for 20 minutes or until completely dry to ensure sterility.
- Make Pickling Brine: In a large pot, combine water, distilled white vinegar, granulated sugar, fine salt, and bay leaves. Bring the mixture to a boil over medium heat, then reduce to low and let it simmer for 5 minutes. Remove from heat, ensure sugar and salt are dissolved, discard bay leaves, and let the brine rest for 10 minutes to cool slightly.
- Fill Jars: Wash cucumbers thoroughly and trim off both ends. Place 2-3 twigs of fresh dill, 2 garlic cloves, and about 5 peppercorns into the bottom of each sterilized jar. Tightly pack the jars with cucumbers. Slowly pour the warm pickling brine over the cucumbers until it reaches just below the rim, leaving approximately 1/2 inch of headspace. Cover jars loosely with lids but do not seal tightly yet.
- Process the Jars: Line the bottom of a large pot with a kitchen towel or microfiber towel if you don’t have a rack. This prevents jars from cracking during heat processing. Place the packed jars upright into the pot and fill with warm water until it reaches approximately 2 inches below the jar rims. Cover the pot with a lid, bring the water to a boil over medium-high heat, then reduce the heat to low and let the jars boil for about 15 minutes or until the cucumbers turn a light green color.
- Seal the Jars: Using a jar lifter, carefully remove each jar from the boiling water. Immediately seal them tightly with lids using a kitchen towel or heat-safe mitt to protect your hands. Flip each jar upside down and cover them with bath towels or blankets to insulate as they cool. Let jars sit undisturbed at room temperature for 12 to 24 hours. Hearing a popping sound indicates that jars have sealed properly. Store your homemade dill pickles in a cool, dark place for best results.
Notes
- Use fresh firm cucumbers, preferably pickling cucumbers, for the best crunch.
- Ensure jars and lids are properly sterilized to avoid spoilage during storage.
- Adjust vinegar acidity if you use a different brand; 5-6% acidity is ideal for safe pickling.
- If you prefer spicier pickles, consider adding red pepper flakes or mustard seeds to each jar.
- Store sealed pickles in a cool, dark place and refrigerate after opening.
- Allow pickles to sit for at least 1-2 weeks to develop full flavor before consuming.
Nutrition
- Serving Size: 1/4 cup (about 35g)
- Calories: 10
- Sugar: 1.5 g
- Sodium: 450 mg
- Fat: 0 g
- Saturated Fat: 0 g
- Unsaturated Fat: 0 g
- Trans Fat: 0 g
- Carbohydrates: 3 g
- Fiber: 1 g
- Protein: 0.3 g
- Cholesterol: 0 mg
Keywords: dill pickles, homemade pickles, fermented cucumbers, easy pickle recipe, canning, preserved cucumbers, garlicky pickles

