
Witch’s Cauldron Halloween Brownie Bites Recipe
Introduction
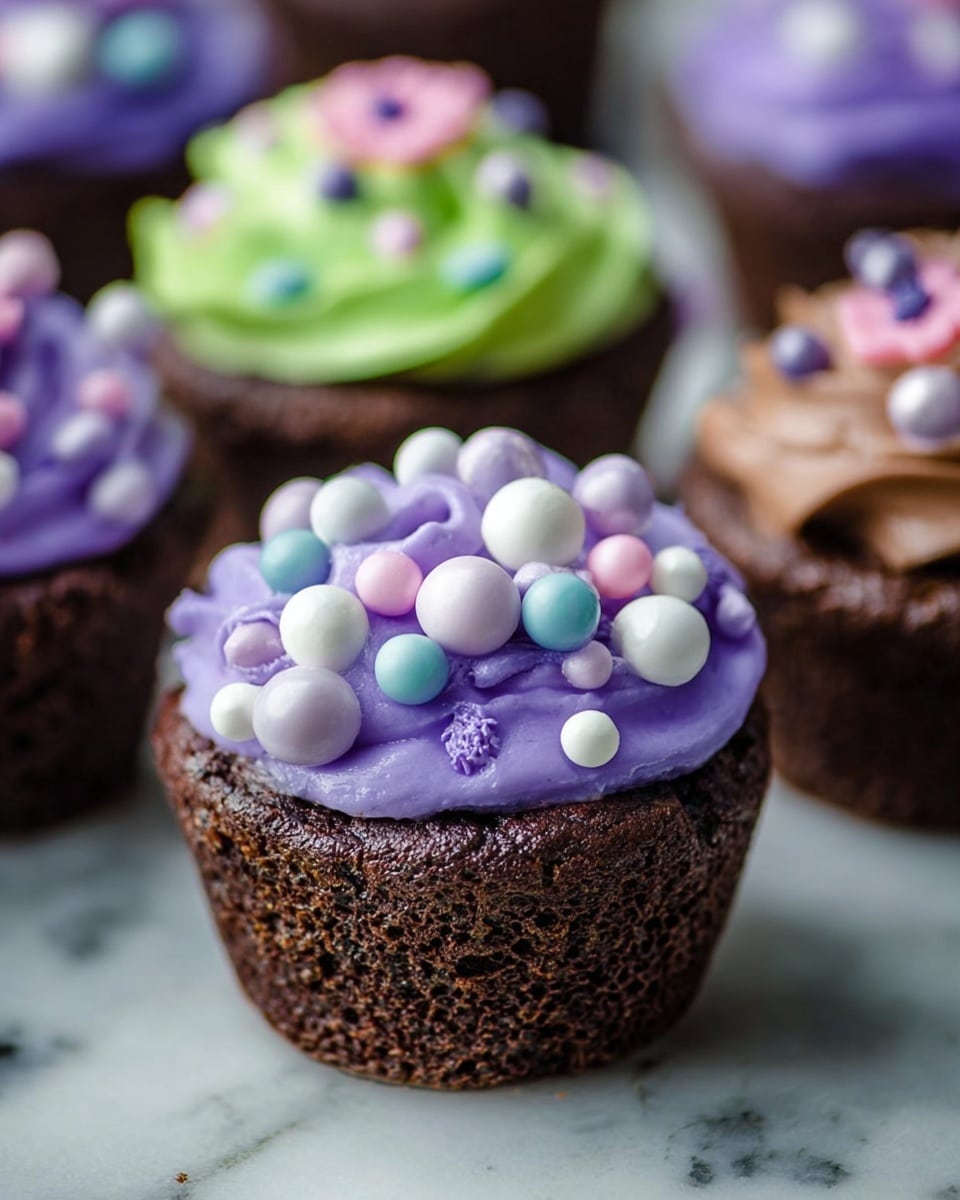
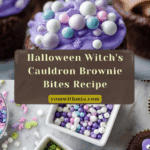
These Witch’s Cauldron Halloween Brownie Bites are the perfect spooky treat for your Halloween celebrations. Miniature, fudgy brownies topped with creamy, colorful frosting and festive decorations make for a fun and delicious dessert that’s sure to impress.
Ingredients
- 12 tablespoons unsalted butter, cut into tablespoon-sized pieces
- ½ cup semisweet chocolate chips
- ½ cup natural cocoa powder
- ½ teaspoon instant coffee grounds (optional)
- 1 cup tightly packed light or dark brown sugar
- ½ cup granulated sugar
- 2 large eggs + 1 large egg yolk
- 1 teaspoon vanilla extract
- 1 cup + 2 tablespoons all-purpose flour
- ½ teaspoon baking powder
- ½ teaspoon salt
- ½ cup (1 stick) salted butter, softened
- 8 oz cream cheese, softened (brick-style, not spreadable)
- 1 teaspoon vanilla extract (for frosting)
- 4 cups powdered sugar
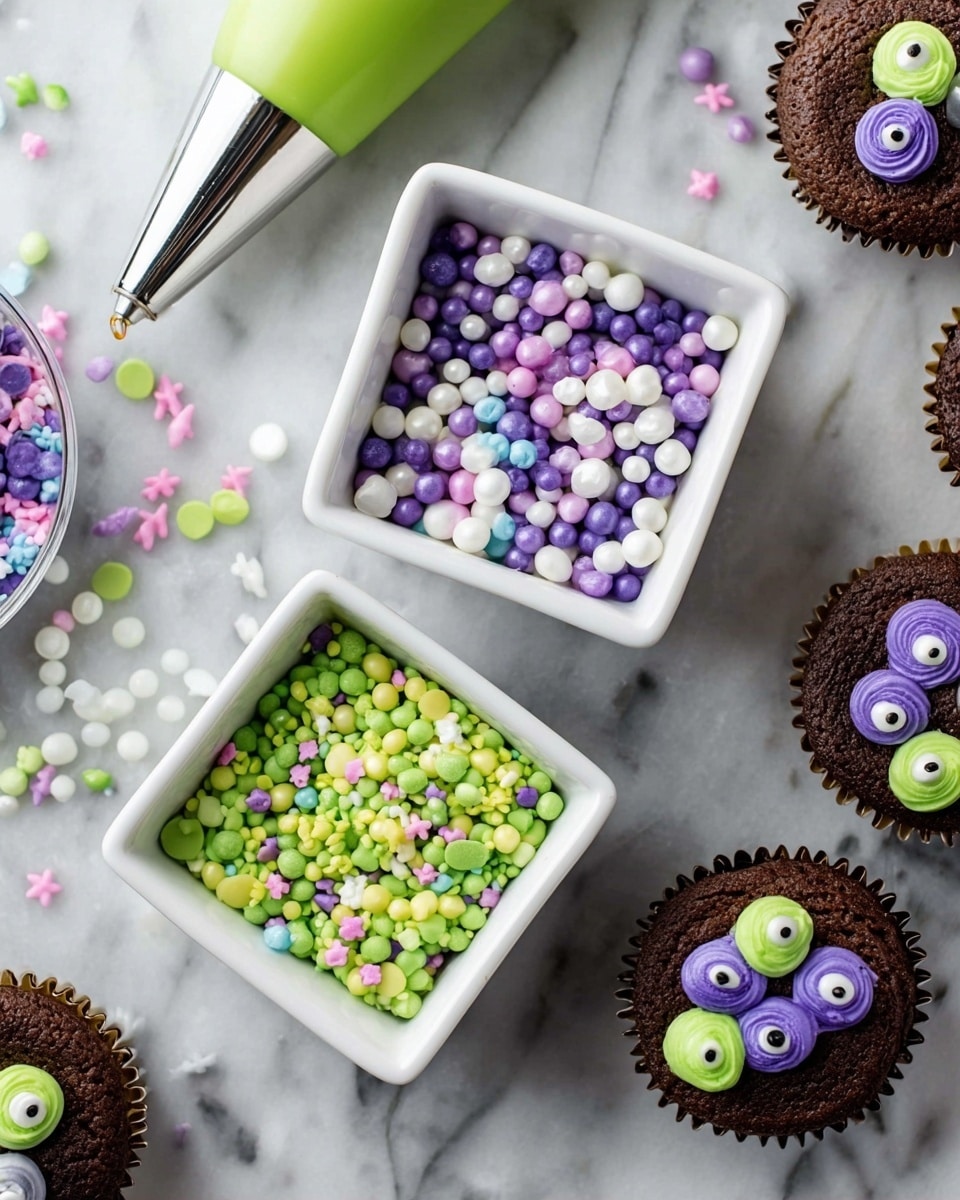
- Food coloring (such as Americolor gel “mint green” and “regal purple”)
- Colored sprinkles
- Candy eyeballs
Instructions
- Step 1: Preheat your oven to 350°F (175°C) and spray a 24-count mini muffin tin with baking spray.
- Step 2: In a large, microwave-safe bowl, combine the butter and chocolate chips. Microwave for 30 seconds, stir, then continue microwaving in 15-second increments, stirring each time until fully melted and smooth.
- Step 3: Stir in the cocoa powder and instant coffee grounds if using.
- Step 4: Add both brown and granulated sugars and stir until combined.
- Step 5: Add the eggs and egg yolk one at a time, stirring well after each addition, then stir in the vanilla extract.
- Step 6: In a separate bowl, whisk together the flour, baking powder, and salt.
- Step 7: Add the dry ingredients to the wet ingredients and mix until fully combined.
- Step 8: Using a tablespoon or cookie dough scoop, drop about 1½ tablespoons of batter into each mini muffin cup.
- Step 9: Bake in the preheated oven for 18 minutes, or until a toothpick inserted in the center comes out clean or with a few fudgy crumbs.
- Step 10: Immediately after baking, press a rounded teaspoon or tablespoon into the center of each brownie bite to create a well.
- Step 11: Allow the brownie bites to cool completely in the pan before filling and decorating.
- Step 12: While cooling, prepare the frosting. Beat the softened salted butter and cream cheese together until creamy and lump-free.
- Step 13: Stir in the vanilla extract.
- Step 14: On low speed, gradually add powdered sugar until the frosting is smooth and well combined.
- Step 15: If using colors, add gel food coloring gradually to achieve desired shades. For multiple colors, divide frosting into bowls and color separately.
- Step 16: Spoon or pipe the frosting into the wells of the cooled brownie bites, then decorate with sprinkles and candy eyeballs.
- Step 17: Serve and enjoy your festive Halloween treat!
Tips & Variations
- For a richer chocolate flavor, consider adding an extra tablespoon of cocoa powder.
- If you don’t have instant coffee, you can omit it; it just enhances the chocolate depth.
- Use different gel food coloring to create a variety of spooky or fun colors.
- Use a piping bag with a star tip for a more professional frosting look.
- Swap candy eyeballs for other themed decorations to customize your brownies.
Storage
Store the decorated brownie bites in an airtight container in the refrigerator for up to 4 days. Bring to room temperature before serving for the best flavor and texture. These can also be frozen unfilled; thaw completely before adding frosting and decorating.
How to Serve
Serve this delicious recipe with your favorite sides.
FAQs
Can I make these brownie bites dairy-free?
You can substitute dairy-free butter and cream cheese alternatives, but the texture and flavor may vary slightly.
How do I prevent the frosting from becoming too runny?
Make sure your cream cheese and butter are well softened but not melted. Gradually add powdered sugar and chill the frosting if it becomes too soft before decorating.
PrintWitch’s Cauldron Halloween Brownie Bites Recipe

Witch’s Cauldron Halloween Brownie Bites are a festive and spooky treat perfect for Halloween parties. Rich, fudgy mini brownies are topped with creamy, colorful cream cheese frosting and decorated with fun sprinkles and candy eyeballs, creating a delightful bite-sized dessert that combines indulgent chocolate flavors with playful Halloween decorations.
- Prep Time: 20 minutes
- Cook Time: 18 minutes
- Total Time: 38 minutes
- Yield: 24 mini brownie bites 1x
- Category: Dessert
- Method: Baking
- Cuisine: American
Ingredients
Brownie Bites
- 12 Tablespoons unsalted butter, cut into tablespoon-sized pieces
- ½ cup semisweet chocolate chips
- ½ cup natural cocoa powder
- ½ teaspoon instant coffee grounds (optional)
- 1 cup tightly packed light or dark brown sugar
- ½ cup granulated sugar
- 2 large eggs + 1 large egg yolk
- 1 teaspoon vanilla extract
- 1 cup + 2 Tablespoons all-purpose flour
- ½ teaspoon baking powder
- ½ teaspoon salt
Frosting
- ½ cup (1 stick) salted butter, softened
- 8 oz cream cheese, softened (brick-style, not spreadable)
- 1 teaspoon vanilla extract
- 4 cups powdered sugar
- Food coloring (Americolor gel “mint green” and “regal purple” recommended)
Decorations
- Colored sprinkles
- Candy eyeballs
Instructions
- Preheat and prepare muffin tin: Preheat the oven to 350°F (175°C) and spray a 24-count mini muffin tin with baking spray to prevent sticking.
- Melt butter and chocolate: Combine the butter and semisweet chocolate chips in a large microwave-safe bowl. Microwave for 30 seconds, stir, then microwave for 15 seconds and stir again. Repeat the 15-second microwaving and stirring until fully melted and combined.
- Add cocoa and coffee: Stir in the cocoa powder and instant coffee grounds if using, blending well into the chocolate mixture.
- Mix sugars: Add both the light or dark brown sugar and granulated sugar to the chocolate mixture and stir until well combined.
- Add eggs and vanilla: Incorporate the eggs and egg yolk one at a time, stirring well after each addition. Then stir in the vanilla extract evenly.
- Combine dry ingredients: In a separate medium bowl, whisk together the all-purpose flour, baking powder, and salt.
- Mix dry into wet: Gradually add the dry ingredients to the wet chocolate batter, stirring until just combined and smooth.
- Fill muffin tin: Using a cookie dough scoop or tablespoon measure, drop about 1 ½ tablespoons of batter into each mini muffin cup, filling them evenly.
- Bake brownies: Bake in the preheated oven for 18 minutes or until a toothpick inserted into the center of a brownie bite comes out clean or with a few fudgy crumbs but not wet batter.
- Create wells: Immediately after removing from the oven, press a rounded teaspoon or tablespoon into the center of each brownie bite to form a small well for the frosting.
- Cool brownies: Allow the brownie bites to cool completely in the muffin tin before removing and frosting.
- Prepare frosting: In a large bowl, beat the softened butter and cream cheese with an electric mixer until creamy, smooth, and lump-free.
- Add vanilla and sugar: Stir in the vanilla extract, then gradually add the powdered sugar on low speed until fully incorporated and smooth.
- Color frosting: If using one color, add gel food coloring gradually until desired intensity is reached. For two colors, divide frosting evenly and color separately, mixing thoroughly.
- Decorate brownies: Spoon or pipe the frosting into the wells of the cooled brownie bites. Decorate with colored sprinkles and candy eyeballs to create a spooky Halloween effect.
- Serve and enjoy: Serve the decorated brownie bites at your Halloween gathering and enjoy the festive and delicious treat.
Notes
- Instant coffee enhances the chocolate flavor but is optional.
- Use gel food coloring for vibrant frosting colors without altering frosting consistency.
- Make sure brownie bites are completely cool before frosting to prevent melting.
- Store leftover brownies in an airtight container in the refrigerator for up to 3 days.
- For easier removal, let brownies cool slightly in the muffin tin before carefully removing with a small spatula.
Keywords: Halloween, Brownie Bites, Mini Brownies, Halloween Dessert, Chocolate, Cream Cheese Frosting, Festive Treats, Party Snack, Spooky Sweets