
Strawberry Cheesecake Poke Cake Recipe
Introduction
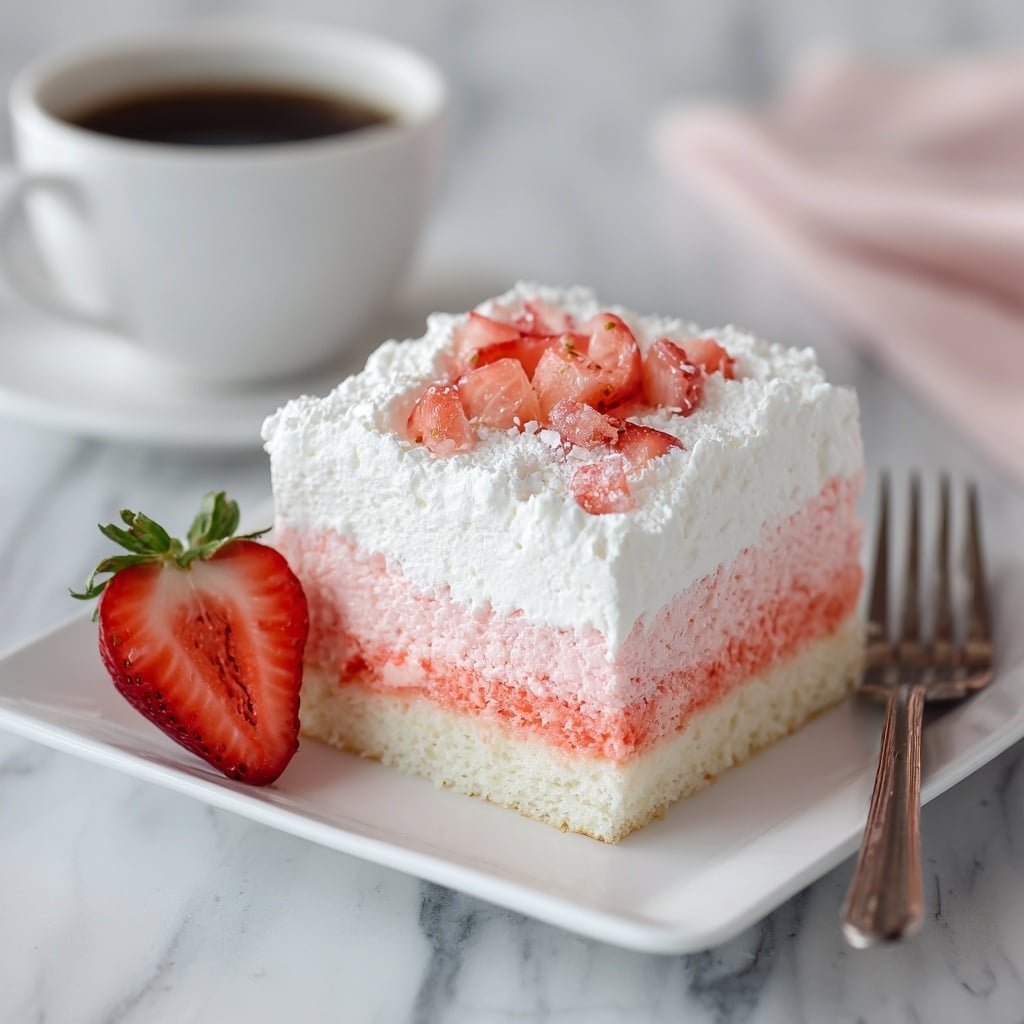
Strawberry Cheesecake Poke Cake is a delightful dessert that combines moist strawberry cake with creamy cheesecake pudding and fresh strawberries. Its unique texture and sweet, tangy flavors make it a crowd-pleaser for any occasion.

Ingredients
- 15.25 ounces strawberry cake mix
- 1 cup water
- ½ cup vegetable oil
- 3 large eggs (room temperature)
- 7 ounces cheesecake instant pudding (two 3.5-ounce packages)
- 3½ cups cold whole milk
- 8 ounces whipped topping (thawed)
- 1 cup chopped strawberries (washed, dried, capped, hulled, optional garnish)
Instructions
- Step 1: Preheat the oven to 350°F. Spray a 9×13-inch baking dish with baking spray.
- Step 2: In a medium mixing bowl, combine the cake mix, water, and vegetable oil. Use a handheld mixer on medium speed to mix until well blended.
- Step 3: Add the eggs one at a time, mixing well after each addition until fully incorporated and no yellow streaks remain.
- Step 4: Pour the batter into the prepared baking dish and bake for 25 to 28 minutes. Insert a toothpick to check doneness; it should come out clean.
- Step 5: Let the cake cool slightly. Using the handle of a wooden spoon, poke holes about 1 to 1½ inches apart all over the cake. Allow the cake to cool completely.
- Step 6: In a clean medium bowl, add the cheesecake pudding mixes and cold milk. Mix with a handheld mixer on medium speed for about 1 minute until the pudding thickens.
- Step 7: Spoon 1½ cups of the pudding into a piping bag with a large 1A decorator’s tip or a quart-sized zip-top bag with a corner cut off.
- Step 8: Pipe the pudding into each hole until filled. Combine any remaining pudding for use as the cake topping.
- Step 9: Use an offset spatula to spread the remaining pudding evenly over the top of the cake.
- Step 10: Cover the cake and refrigerate for at least 2 hours to let it set.
- Step 11: Before serving, spread the thawed whipped topping evenly over the pudding layer. Sprinkle with chopped strawberries. Slice and keep refrigerated until ready to serve.
Tips & Variations
- For extra strawberry flavor, add a few drops of strawberry extract to the cake batter.
- Use fresh strawberries for garnish on top to brighten the cake and add a juicy texture contrast.
- If you don’t have a piping bag, a spoon can be used to fill the holes gently with pudding.
- Try using low-fat milk and light whipped topping for a lighter version of this dessert.
Storage
Store the cake covered in the refrigerator for up to 3 days. Keep it chilled until ready to serve to maintain the creamy texture. Leftovers can be reheated briefly at room temperature, but refrigeration is best to preserve freshness and prevent spoilage.
How to Serve
Serve this delicious recipe with your favorite sides.
FAQs
Can I use a different cake flavor for this poke cake?
Yes, you can experiment with other cake flavors like yellow, vanilla, or even chocolate. Just keep the cheesecake pudding and strawberry toppings for the best flavor combination.
What if I don’t have instant cheesecake pudding?
If instant cheesecake pudding isn’t available, you can substitute with vanilla pudding and add a teaspoon of cream cheese or lemon juice to mimic the tangy flavor of cheesecake.
PrintStrawberry Cheesecake Poke Cake Recipe

This delightful Strawberry Cheesecake Poke Cake combines moist strawberry-flavored cake with creamy cheesecake pudding filling. Poking holes in the cake creates pockets that soak up the cheesecake pudding, resulting in a rich, luscious dessert topped with whipped topping and fresh strawberries. Perfect for gatherings or an indulgent treat, this poke cake offers a wonderful blend of fruity sweetness and creamy texture.
- Prep Time: 15 minutes
- Cook Time: 28 minutes
- Total Time: 2 hours 43 minutes
- Yield: 12 servings 1x
- Category: Dessert
- Method: Baking
- Cuisine: American
Ingredients
Cake
- 15.25 ounces strawberry cake mix
- 1 cup water
- ½ cup vegetable oil
- 3 large eggs, room temperature
Filling
- 7 ounces cheesecake instant pudding (2 packages)
- 3½ cups cold whole milk
Topping & Garnish
- 8 ounces whipped topping, thawed
- 1 cup chopped strawberries, washed, dried, capped, hulled, and optional garnish
Instructions
- Preheat and Prepare Pan: Preheat the oven to 350°F. Spray a 9×13 inch baking dish with baker’s spray to prevent sticking.
- Mix Cake Batter: In a medium mixing bowl, combine the strawberry cake mix, water, and vegetable oil. Using a handheld mixer on medium speed, mix until well combined.
- Add Eggs: Add eggs one at a time, mixing well after each addition until the batter is smooth and no yellow streaks remain.
- Bake the Cake: Pour the batter into the prepared baking dish and bake for 25 to 28 minutes. Check doneness by inserting a toothpick; it should come out clean.
- Cool and Poke Holes: Let the cake cool slightly. Using the handle of a wooden spoon, poke holes about 1 to 1½ inches apart over the entire cake surface. Allow the cake to cool completely.
- Prepare Cheesecake Pudding: In a medium bowl, combine the cheesecake instant pudding mix with cold whole milk. Mix with a handheld mixer on medium speed for about 1 minute, until the pudding begins to thicken.
- Fill Holes: Transfer 1½ cups of pudding into a piping bag fitted with a large 1A decorator’s tip or a ziplock bag with a corner snipped off.
- Pipe Pudding into Cake: Pipe the pudding into each hole, filling them entirely. Mix any leftover pudding with the remaining pudding for the top layer.
- Smooth Top Layer: Use an offset spatula to evenly smooth the remaining pudding over the cake’s surface.
- Chill: Cover the cake and refrigerate for at least 2 hours to set.
- Add Whipped Topping and Strawberries: Spread the thawed whipped topping evenly over the pudding layer. Sprinkle with chopped strawberries for garnish. Slice and keep refrigerated until serving.
Notes
- For best results, use room temperature eggs to help the batter mix smoothly.
- Make sure the pudding is cold before mixing to achieve proper thickness.
- Use fresh strawberries for garnish to add texture and flavor contrast.
- Chilling the cake allows the pudding to soak into the cake holes, enhancing moistness and flavor.
- You can substitute whipped topping with fresh whipped cream for a less processed option.
Keywords: Strawberry Cheesecake Poke Cake, Strawberry Cake, Cheesecake Pudding Dessert, Easy Poke Cake, No-Bake Cheesecake Filling, Summer Dessert


