
Stained Glass Sugar Cookies Recipe
Introduction
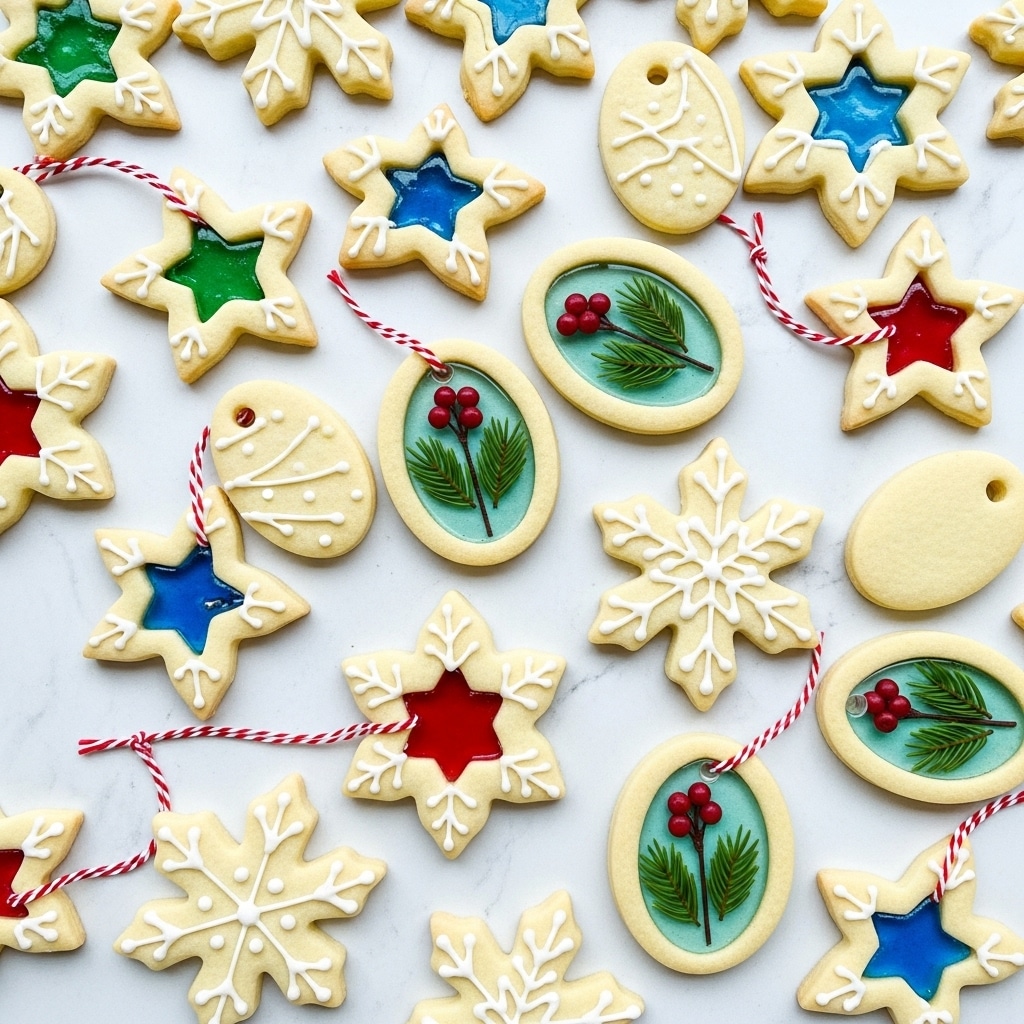
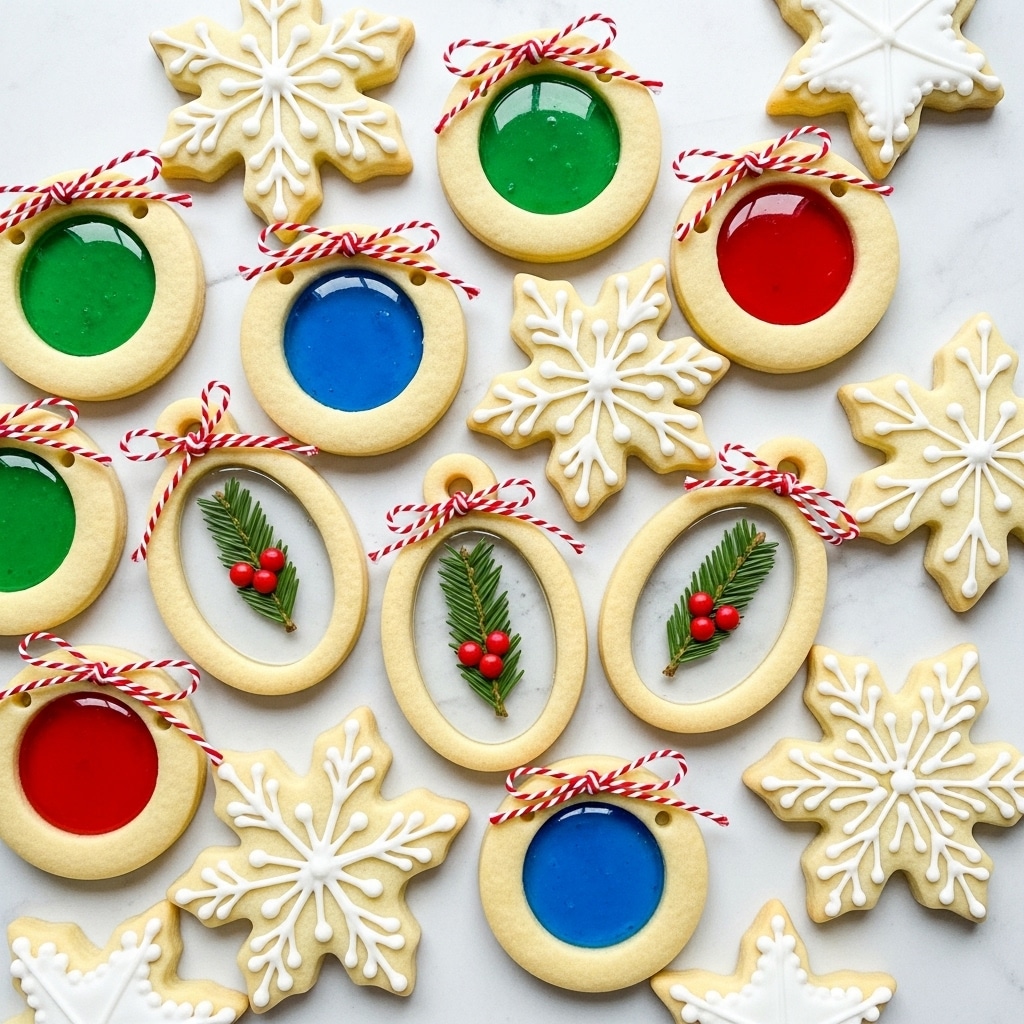
Stained Glass Sugar Cookies are a festive twist on a classic treat, featuring colorful melted candy centers that sparkle like stained glass. Perfect for holiday decorating and gifting, these cookies combine buttery dough with vibrant candy or clear isomalt for a beautiful effect.
Ingredients
- ¾ cup unsalted butter, softened to room temperature
- 1 cup granulated sugar
- 1 teaspoon vanilla extract
- 2 large eggs
- 2 ½ cups all-purpose flour (spooned and leveled)
- 1 teaspoon baking powder
- ½ teaspoon kosher salt
- 8-10 colored hard candies (like Jolly Ranchers) in colors of your choice
- Optional (for the clear glass version): 1 cup isomalt crystals, fresh rosemary and dried cranberries, pink peppercorns or red pearl sprinkles
Instructions
- Step 1: Add butter, sugar, and vanilla extract to a large mixing bowl or stand mixer. Beat at medium speed until light and fluffy, about 3 minutes.
- Step 2: Add eggs one at a time, mixing just until combined after each addition.
- Step 3: In a separate bowl, whisk together the flour, baking powder, and salt.
- Step 4: Add dry ingredients to the wet ingredients in 3-4 batches, mixing until the dough comes together. Cover and chill in the refrigerator for 30 minutes.
- Step 5: Preheat the oven to 350°F and line two sheet pans with parchment paper.
- Step 6: Divide the dough in half. On a floured surface, roll out half the dough into a ¼-inch thick rectangle. Cut out desired shapes, then cut smaller shapes from the centers to create a window. If making ornaments, pierce a hole at the top of each cookie with a skewer.
- Step 7: Choose either the hard candy or isomalt filling method to fill the cookie centers.
- Step 8 (Hard Candy Method): Separate hard candies by color and crush them into fine pieces using a plastic bag and rolling pin or a small food processor.
- Step 9: Place cutouts on the baking sheet 1-2 inches apart. Fill each center cavity about ¾ full with the crushed candy.
- Step 10: Bake for about 8 minutes until the bottoms are lightly browned and the candy is melted. Watch closely to prevent burning. Let cookies cool on the baking sheet to set. For ornaments, reinforce the hole with a skewer while warm.
- Step 11 (Isomalt Method): Place cutouts on the baking sheet and bake for about 8 minutes until lightly browned. Cool 2 minutes on the pan, then transfer to a cooling rack until completely cool. Reinforce ornament holes if needed.
- Step 12: Prepare decorations (rosemary sprigs, dried cranberries, peppercorns, sprinkles).
- Step 13: In a small, heavy-bottomed saucepan, melt the isomalt crystals over medium-high heat without stirring, gently swirling to melt evenly, about 5 minutes. Remove from heat and let bubbles settle.
- Step 14: Carefully pour melted isomalt into each cookie cavity, filling it. Work in small batches to allow adding decorations before it sets.
- Step 15: Use tweezers or a skewer to arrange rosemary and dried cranberries inside the isomalt. Ensure rosemary touches the isomalt to avoid browning. Repeat for all cookies.
- Step 16: Allow isomalt to set for about 10 minutes. If it starts to harden while still in the pan, remelt gently over medium heat.
- Step 17: For ornaments, thread twine through each cookie hole and tie a knot. Hang on trees or garlands as decoration.
Tips & Variations
- For clean cutouts, chill dough well before rolling and use flour sparingly to prevent sticking.
- Use individually colored hard candies for a vibrant stained-glass effect, or try the clear isomalt version for a more elegant look with decorative herbs and berries.
- If you don’t have isomalt, you can make the hard candy version exclusively for a bright splash of color.
- Make sure to watch the candy melting closely to avoid burning, as burnt candy can be bitter and ruin the look.
- Isomalt can be found at specialty baking stores or online; it melts cleaner than regular sugar and is safer to work with for clear “glass.”
Storage
Store the cookies in an airtight container at room temperature for up to one week. Keep them separated with parchment paper to prevent sticking. Reheat is not recommended as it may melt the candy center. For display ornaments, handle gently to avoid breaking the stained glass sections.
How to Serve
Serve this delicious recipe with your favorite sides.
FAQs
Can I use regular sugar instead of isomalt for the clear glass cookies?
Regular sugar can be used but it doesn’t melt as clearly and is more prone to bubbling and browning. Isomalt melts more cleanly and is better for clear, glass-like cookies.
How do I prevent the candy from burning while baking?
Bake the cookies at 350°F for about 8 minutes and watch them closely during the last few minutes. Candy melts quickly and can go from melted to burnt in under a minute, so stay near the oven and remove them as soon as the candy is fully melted.
PrintStained Glass Sugar Cookies Recipe
Delight in these festive Stained Glass Sugar Cookies, perfect for the holiday season or special occasions. Featuring a buttery sugar cookie base filled with vibrant crushed hard candies or clear isomalt for a stunning stained glass effect, these treats brighten any cookie platter and double as charming edible ornaments.
- Prep Time: 15 minutes
- Cook Time: 8 minutes
- Total Time: 55 minutes
- Yield: About 24 cookies depending on size and cutter 1x
- Category: Baking
- Method: Baking
- Cuisine: American
Ingredients
Cookie Dough
- ¾ cups unsalted butter, softened to room temperature
- 1 cup granulated sugar
- 1 teaspoon vanilla extract
- 2 large eggs
- 2 ½ cups all purpose flour (spooned and leveled)
- 1 teaspoon baking powder
- ½ teaspoon kosher salt
Filling Options
- 8–10 colored hard candies (like Jolly Ranchers) in colors of your choice
- Optional clear glass filling:
- 1 cup isomalt crystals
- Fresh rosemary sprigs (small, for decoration)
- Dried cranberries
- Pink peppercorns or red pearl sprinkles
Instructions
- Prepare the dough: In a large mixing bowl or stand mixer, beat the softened butter, granulated sugar, and vanilla extract on medium speed for about 3 minutes until the mixture is light and fluffy. Add eggs one at a time, mixing just until incorporated.
- Mix dry ingredients: In a separate bowl, whisk together the flour, baking powder, and kosher salt. Gradually add the dry mixture into the wet ingredients in 3 to 4 batches, mixing until the dough forms. Wrap and chill the dough in the refrigerator for 30 minutes to firm up.
- Preheat oven and prepare pans: Set your oven to 350˚F (175˚C) and line two baking sheets with parchment paper.
- Roll and cut dough: On a lightly floured surface, divide the chilled dough in half. Roll out one half into a ¼-inch thick rectangle. Using cookie cutters (round, snowflake, ornament shapes), cut out cookies. Then, cut smaller shapes from the centers of each cookie to create the stained glass windows. If making ornaments, create a small hole near the top using a skewer for hanging later.
- Prepare hard candy (for colored glass effect): Separate hard candies by color and crush them finely using a plastic bag and rolling pin or pulse with a small food processor until pieces are fine.
- Assemble cookies with hard candy: Place the cutout cookies on the prepared pans, leaving 1-2 inches between each. Fill the cookie centers about ¾ full with crushed hard candy pieces.
- Bake hard candy cookies: Bake for approximately 8 minutes, watching carefully until the bottoms are lightly browned and the candy has fully melted. This time can vary by thickness. Remove from oven and cool on the baking sheet so the candy hardens.
- Prepare for clear glass option: Use the other half of the dough cut out in the same way and bake on lined sheets for about 8 minutes until bottoms are lightly browned. Allow cookies to cool for 2 minutes on the sheet, then transfer to a wire rack to cool completely. If making ornaments, poke or reinforce holes right after baking with a skewer.
- Melt isomalt crystals: In a small heavy-bottom saucepan over medium-high heat, melt the isomalt crystals without stirring, gently swirling as it liquifies. Takes about 5 minutes to fully melt into a clear liquid. Let bubbles settle before using.
- Fill cookies with isomalt: Working quickly and carefully (wear safety gloves as isomalt is very hot), pour the melted isomalt into the centers of the cooled cookies, filling cavities fully. Work in small batches of about 3 cookies at a time to prevent the isomalt from hardening.
- Decorate with herbs and berries: Using tweezers or a long skewer, arrange fresh rosemary sprigs in the isomalt filling ensuring they touch the liquid to avoid browning. Add 3 dried cranberries and optionally pink peppercorns or red pearl sprinkles as desired. Repeat for all cookies. Isomalt will set within 10 minutes. Remelt in the pan if it begins to harden before pouring.
- Finish ornaments: For decorative cookies with holes, thread twine through once isomalt has set and tie knots to create beautiful edible ornaments ready for hanging on trees or garlands.
Notes
- Keep a close eye on the candy-filled cookies during baking as the hard candy can burn quickly.
- Use safety gloves when handling hot isomalt to prevent burns.
- For best results, roll cookies evenly to about ¼ inch thickness to ensure balanced baking and melting.
- The isomalt version is for decorative use only and makes beautiful non-edible ornaments.
- Store cookies in an airtight container at room temperature for up to 5 days to maintain freshness.
Keywords: stained glass sugar cookies, holiday cookies, Christmas cookies, edible ornaments, hard candy cookies, isomalt cookies

