
Rustic Italian Pizza Dough with Heirloom Tomatoes, Caramelized Onions, and Fresh Basil Recipe
Introduction
This rustic Italian pizza dough recipe creates a thin, flavorful crust perfect for homemade pizzas topped with your favorite ingredients. With simple pantry staples and a step-by-step approach, you can achieve authentic pizzeria results right in your kitchen.
Ingredients
- 5 cups all-purpose flour (or 00 flour), plus extra for dusting
- 1.5 tsp instant dry yeast (or active dry yeast)
- 1.5 tsp sea salt
- 2.25 cups cold water
- 1 tbsp extra virgin olive oil
- Caramelized onions (optional toppings)
- Arrabiata sauce (for spreading)
- Heirloom tomatoes (optional toppings)
- Fresh basil (for garnish)
- Green onions (optional toppings)
- Smoked mozzarella cheese (for topping)
- Sautéed mushrooms (optional toppings)
- Ricotta meatballs (optional toppings)
- Roasted peppers (optional toppings)
Instructions
- Step 1: Preheat your oven to its highest temperature and place a pizza stone inside. Allow it to heat for at least 45 minutes to one hour. For example, 525°F works well, but check the maximum temperature for your stone.
- Step 2: In a mixing bowl, combine the flour, sea salt, and yeast on low speed using a paddle attachment. Gradually add the cold water.
- Step 3: Switch to a dough hook and mix on low speed for 8 to 10 minutes. The dough should be smooth and sticky but should only slightly stick to the bottom of the bowl, not the sides.
- Step 4: If the dough sticks to the sides, sprinkle in a bit more flour. If it feels too dry, add a little water. Adjust as needed since flour absorption can vary.
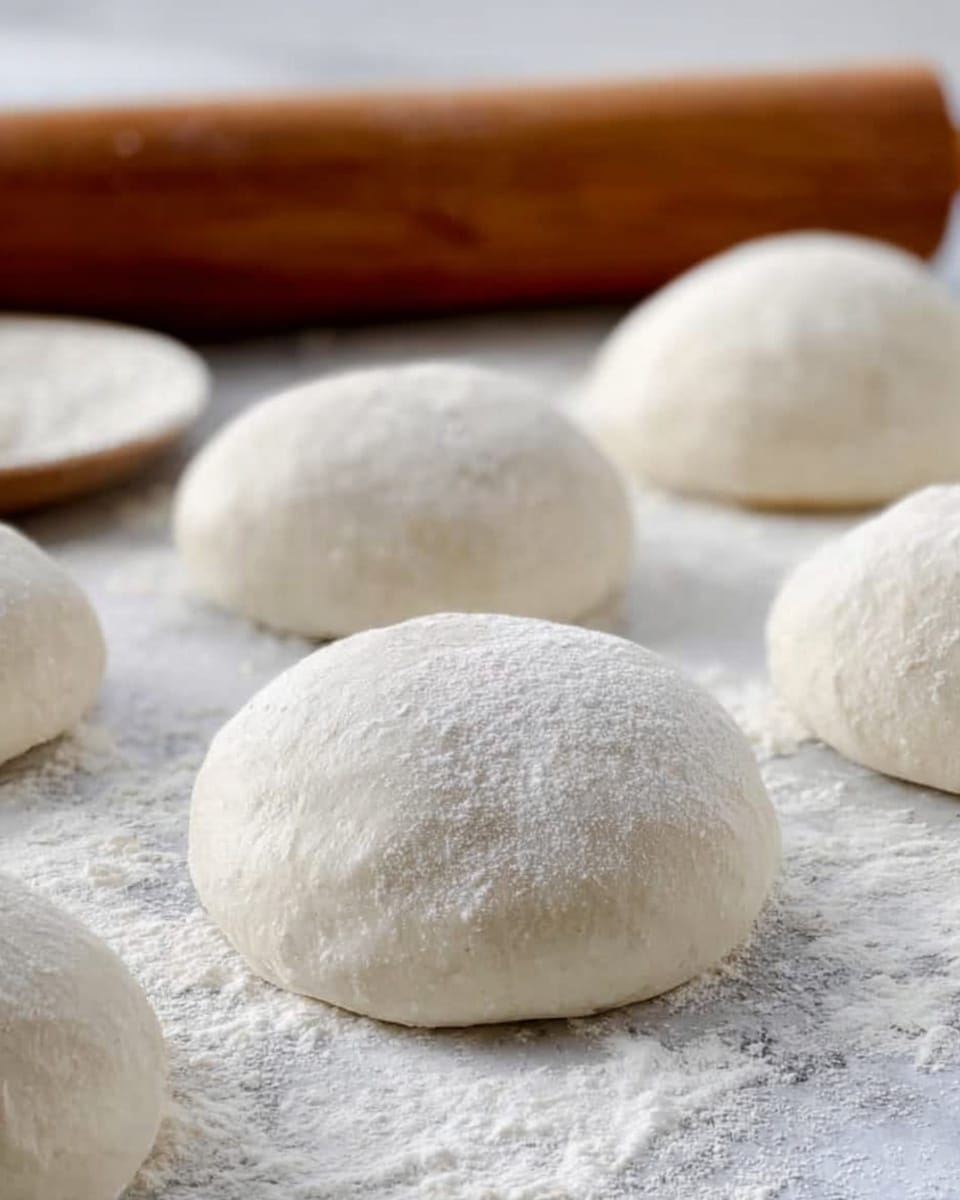
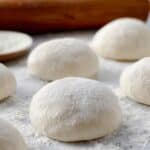
- Step 5: Remove the dough and divide it into 6 equal pieces. Shape each into rounds and place on a lightly oiled baking sheet. Drizzle about 1 tablespoon of olive oil over the rounds, cover with plastic wrap, and let rise at room temperature for 2 hours in a draft-free space (a turned-off, cold oven works well).
- Step 6: Lightly flour a clean surface. Take one dough piece and press it down with your fingers to about ½ inch thickness, shaping into a circle or oval. Use your fists and knuckles to gently stretch it to roughly 10 inches in diameter, being careful not to tear the dough.
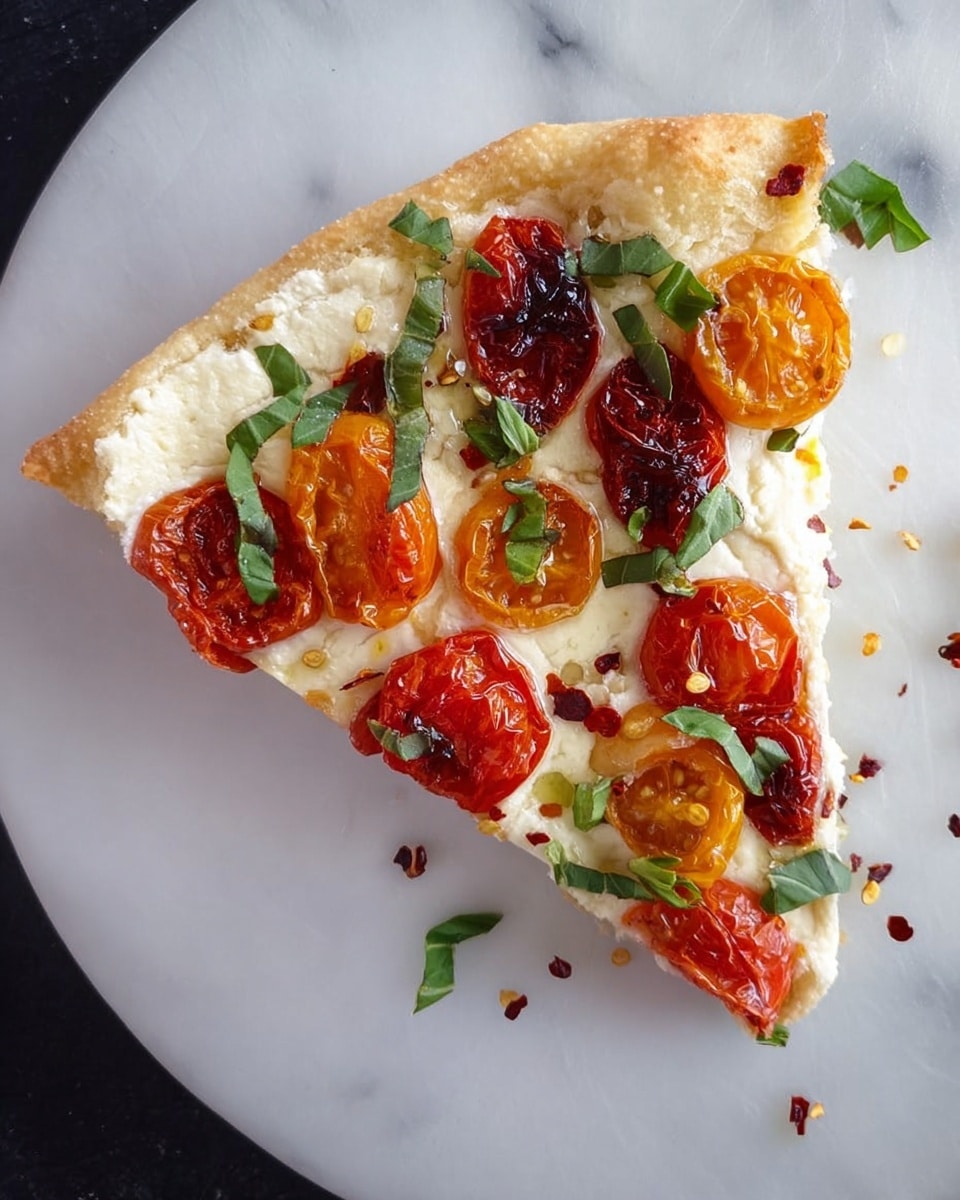
- Step 7: Dust your pizza peel or a piece of sturdy cardboard with semolina flour or cornmeal. Transfer the stretched dough onto it, ensuring it slides easily. Spread 2-3 tablespoons of arrabiata sauce over the dough, leaving a 1-inch border. Sprinkle with smoked mozzarella and add your chosen toppings sparingly to keep the crust thin and crisp.
- Step 8: Carefully slide the pizza onto the preheated stone in the hot oven. Bake for 5 to 7 minutes, or until the crust is golden brown around the edges. For pizzas with eggs, 6 minutes usually cooks the egg perfectly.
- Step 9: Remove the pizza from the oven and garnish with fresh basil and freshly grated Parmigiano Reggiano. Let rest a few minutes for the cheese to set before slicing.
- Step 10 (Optional): For a hand-mixing method, combine flour, yeast, salt, and cold water in a large bowl using a wooden spoon. Turn the dough onto a floured surface and knead by hand for 10 to 15 minutes until smooth but slightly sticky. Then proceed with shaping and baking as above.
Tips & Variations
- Use 00 flour if available for a more authentic, tender crust; otherwise, all-purpose flour works well.
- Keep semolina or cornmeal on hand to dust your pizza peel for easy transfer to the oven.
- Do not overload with toppings to maintain a crispy crust—choose two or three favorites.
- For thicker crust, let the dough rise a bit longer or avoid stretching too thin.
- You can refrigerate or freeze prepared dough portions after the first rise for convenience.
Storage
Store unused pizza dough tightly wrapped in the refrigerator for up to 2 days or freeze individual dough balls for up to 3 months. Thaw frozen dough overnight in the refrigerator before use. Leftover baked pizza can be reheated in a hot oven or skillet to preserve crispness.
How to Serve
Serve this delicious recipe with your favorite sides.
FAQs
Can I use active dry yeast instead of instant yeast?
Yes, you can substitute active dry yeast in the same quantity. Just dissolve it in a small amount of warm water before mixing with other ingredients.
How do I know when the dough has risen enough?
The dough should roughly double in size and feel puffy and soft. It should not collapse easily when gently pressed with a finger.
PrintRustic Italian Pizza Dough with Heirloom Tomatoes, Caramelized Onions, and Fresh Basil Recipe
This Rustic Italian Pizza Dough recipe yields a chewy, flavorful thin-crust pizza base perfect for a variety of toppings. Using cold water and a long rise enhances the dough’s texture and flavor, while baking on a preheated pizza stone at high temperature ensures a golden, crispy crust. Ideal for both an electric mixer or a hands-on kneading approach, this dough forms the foundation for authentic Italian-style pizzas with your favorite toppings.
- Prep Time: 15 minutes
- Cook Time: 7 minutes
- Total Time: 2 hours 22 minutes
- Yield: 6 small pizzas (about 10-inch each) 1x
- Category: Dinner
- Method: Baking
- Cuisine: Italian
- Diet: Vegetarian
Ingredients
For Dough
- 5 cups all purpose flour or 00 flour, plus extra for dusting
- 1.5 tsp instant dry yeast or active dry yeast
- 1.5 tsp sea salt
- 2.25 cups COLD water
- 1 tbsp extra virgin olive oil, plus extra for drizzling
Suggested Toppings
- Caramelized onions
- Arrabiata Sauce
- Heirloom Tomatoes
- Fresh Basil
- Green Onions
- Smoked Mozzarella Cheese
- Sautéed Mushrooms
- Ricotta Meatballs
- Roasted Peppers
Instructions
- Preheat Oven and Pizza Stone: Preheat your oven to its highest temperature, ideally around 525°F, with a pizza stone inside for 45 minutes to one hour to ensure it’s thoroughly heated.
- Mix Dry Ingredients: In the bowl of a stand mixer fitted with the paddle attachment, combine the flour, sea salt, and yeast on low speed until evenly mixed.
- Add Water and Switch Hook: Gradually add the cold water to the dry ingredients. Then switch to the dough hook and mix on low speed for 8 to 10 minutes until the dough is smooth and sticky, but not sticking to the sides of the bowl—only slightly to the bottom.
- Adjust Dough Consistency: If the dough sticks to the sides, sprinkle additional flour gradually; if too dry, add a bit more water. Keep flour handy as dough hydration may vary.
- Portion and Rise: Remove the dough, divide it into six equal pieces, and shape each into a round ball. Place them on a lightly oiled cookie sheet, drizzle with about 1 tablespoon of extra virgin olive oil, cover with plastic wrap, and let rise at room temperature for 2 hours in a draft-free area (such as inside a turned-off oven). Dough can also be refrigerated or frozen after this rise.
- Shape the Dough: Lightly flour your counter. Press a single piece of dough with your fingers into a half-inch thick circle or oval, then stretch it using fists and knuckles into a 10-inch diameter, being careful not to tear the dough.
- Prepare Pizza for Baking: Liberally dust a pizza peel or piece of cardboard with semolina or cornmeal. Place the shaped dough on it, ensuring it can slide freely. Spoon 2-3 tablespoons of pizza (Arrabiata) sauce onto the center and spread evenly, leaving a 1-inch border. Add shredded smoked mozzarella and desired toppings sparingly to maintain a thin crust.
- Bake: Slide the pizza onto the preheated stone in the oven. Bake at 525°F or higher for 5 to 7 minutes, until the edges turn golden brown. For a breakfast pizza with egg, bake for approximately 6 minutes for perfect cooking.
- Finish and Serve: Remove the pizza from the oven, sprinkle freshly torn basil leaves and grated Parmigiano Reggiano over the top. Allow it to rest a few minutes for cheese to set before slicing and serving.
- Optional Hand Method: Pour the flour into a large bowl. Add yeast, salt, and cold water. Mix with a wooden spoon until combined. Transfer dough to a floured surface and knead by hand for 10 to 15 minutes until smooth but slightly sticky. Continue from step 5 onwards as above.
Notes
- Using cold water and a long rise at room temperature enhances dough texture and flavor.
- Keep extra flour handy to adjust dough stickiness during mixing and shaping.
- The pizza stone must be fully heated to ensure a crisp crust.
- Do not overload the pizza with toppings to maintain a thin crust and even cooking.
- Dough can be refrigerated overnight or frozen after the initial rise for convenience.
- Semolina or cornmeal on the peel prevents sticking and helps slide pizza into the oven smoothly.
- Adjust oven temperature depending on your pizza stone’s maximum rating, but aim for 525°F or higher.
- Rest pizza briefly after baking so cheese sets for easier slicing.
Keywords: rustic pizza dough, Italian pizza dough recipe, homemade pizza dough, thin crust pizza, pizza stone baking, easy pizza dough


