
Mini Mason Jar Lid Strawberry Pies Recipe
If you have a penchant for charming, bite-sized desserts that deliver bursts of fruity sweetness, you are going to adore these Mini Mason Jar Lid Strawberry Pies. These delightful little pastries combine a buttery, flaky crust with luscious strawberry jam filling, all perfectly portioned in tiny mason jar lids. They are not only irresistibly delicious but also visually enchanting, making them a perfect treat to impress guests or enjoy a cozy moment with a cup of tea. The Mini Mason Jar Lid Strawberry Pies transform a classic pie into a fun and dainty indulgence you’ll want to make again and again.

Ingredients You’ll Need
Each ingredient in this Mini Mason Jar Lid Strawberry Pies recipe plays a vital role—from the rich butter that creates the flaky crust to the vibrant strawberry jam that fills each mini pie with fruity joy. The simplicity of these ingredients lets the natural flavors shine, making the final results absolutely irresistible.
- Salted Butter (1 cup, cubed and chilled): The foundation of the crust, providing flakiness and rich flavor.
- Granulated Sugar (1/4 cup): Adds just a touch of sweetness and helps tenderize the dough.
- All-Purpose Flour (2 2/3 cups): The main structure of your crust, essential for that perfect balance of crisp and soft.
- Ice Cold Water (1/4 cup): Brings the dough together without warming the butter, helping to keep it flaky.
- Strawberry Jam, Jelly, or Preserves (18 tablespoons): The star filling, bursting with sweet and tangy strawberry flavor.
- Heavy Cream (1 tablespoon): For brushing the tops, adding a gorgeous golden finish when baked.
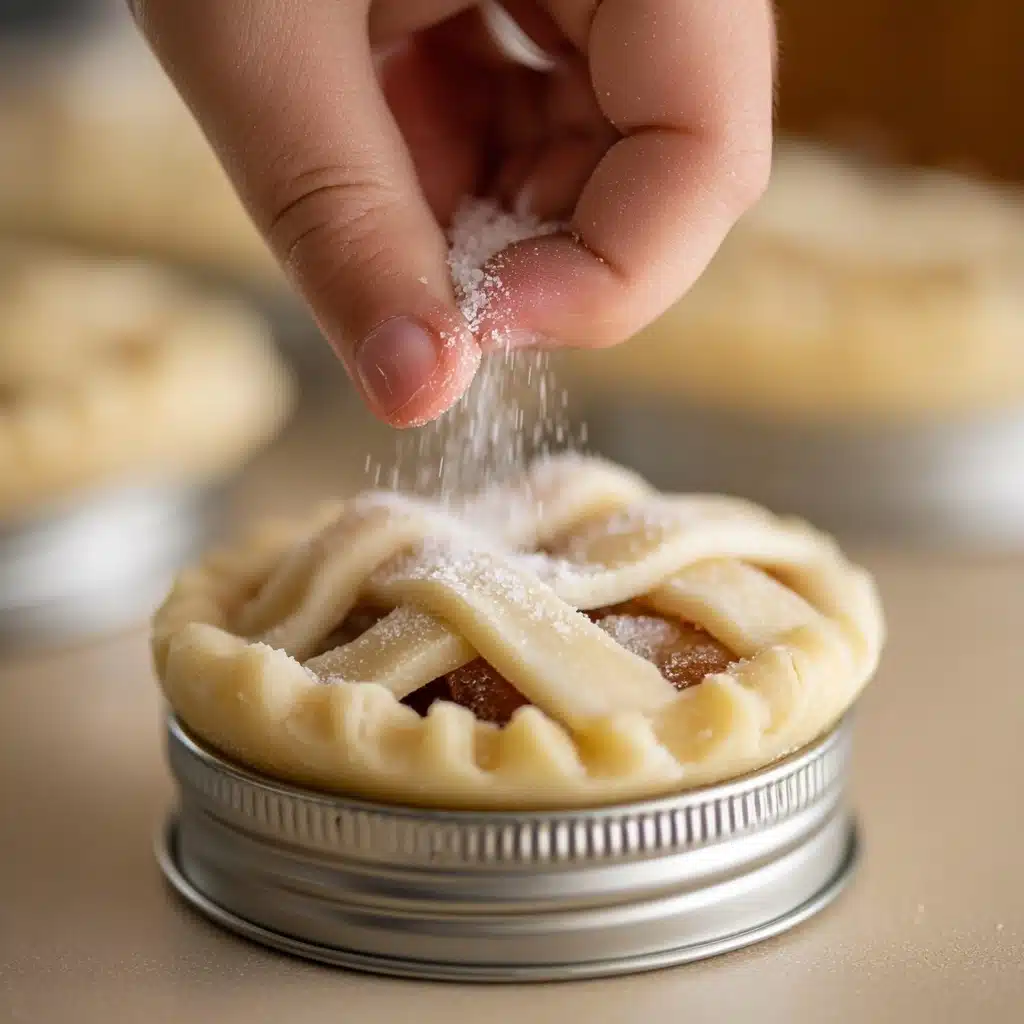
- Sparkling Sugar (1 tablespoon): Gives the pies a sparkling, sweet crunch and extra visual appeal.
How to Make Mini Mason Jar Lid Strawberry Pies
Step 1: Prepare the Crust
Start by combining the chilled, cubed butter, sugar, and flour in a food processor. Pulse until the mixture resembles coarse crumbs—this texture is key for achieving that lovely flaky crust. Gradually add ice cold water while processing, being careful not to overwork the dough. Once the dough starts to come together, transfer it onto plastic wrap, knead just slightly to form a disk, and chill it in the fridge for at least 2 to 3 hours. This resting period chills the butter back and lets the gluten relax, which is crucial for tender pastry.
Step 2: Roll Out the Dough
When you’re ready to bake, take your dough out and let it sit at room temperature for about 15-20 minutes to soften just enough to roll easily. On a well-floured surface, roll the dough out gently, keeping an eye out for any stickiness and dusting with flour as needed. This careful handling ensures the dough is elastic and manageable for shaping your pies in the mason jar lids.
Step 3: Preheat and Prepare
Preheat your oven to 400 degrees Fahrenheit. Arrange 9 clean mason jar lids on a baking sheet—these tiny lids will act as the mold for your pie crust bases, making sure each mini pie has that perfect shape.
Step 4: Cut and Shape the Dough
Using a small mason jar ring (smaller than a wide-mouth), cut out 18 circles from your rolled dough. Gently roll each circle a bit larger and press them into the mason jar lids, letting the dough come up the sides just enough to hold the filling.
Step 5: Add the Strawberry Filling
Spoon about one tablespoon of your luscious strawberry jam into each dough-lined lid. This sweet filling is going to bubble and caramelize during baking, filling your kitchen with an amazing aroma.
Step 6: Create and Add the Lattice Tops
Gather the remaining dough and roll it into a rectangle. Cut six 1/2 inch by 3 inch strips for weaving a lattice top. Weave these strips carefully into a lattice pattern, then use a mason jar ring to cut a circle from the lattice. With a metal spatula, carefully place the lattice on top of each pie, sealing the edges gently.
Step 7: Final Touches Before Baking
Brush each pie with heavy cream and sprinkle generously with sparkling sugar. This final sparkle and glaze add a beautiful golden color and delicate crunch to your pies once they bake.
Step 8: Bake to Perfection
Bake the pies for 13 to 15 minutes, watching closely so the lattice tops just begin to brown and crisp up beautifully without burning. The combination of buttery crust and sweet strawberry filling should be perfectly balanced.
Step 9: Cool and Unmold
Allow your Mini Mason Jar Lid Strawberry Pies to cool for 5 to 10 minutes right in the jar ring and lid. Then gently press from the bottom to release each pie from its mold. Cooling helps the filling to set just enough to keep the pies intact and ready to enjoy.
How to Serve Mini Mason Jar Lid Strawberry Pies
Garnishes
Adding a delicate garnish takes your Mini Mason Jar Lid Strawberry Pies from charming to downright stunning. Consider a light dusting of powdered sugar or a few fresh strawberry slices on top for a fresh burst of color and flavor. A sprig of mint can also add a lovely touch of green to make the presentation pop.
Side Dishes
These little pies are lovely on their own but pair wonderfully with complementary sides. Serve them alongside a scoop of vanilla ice cream or a dollop of whipped cream to balance the tartness of the strawberry filling. For a brunch setting, a cup of creamy latte or freshly brewed herbal tea makes a perfect pairing.
Creative Ways to Present
Mini Mason Jar Lid Strawberry Pies are naturally photogenic, making them great for presentations. Serve them on a decorative platter with a sprinkle of powdered sugar, or place each pie on a mini cake stand for an extra special touch. For festive occasions, wrap each pie with a ribbon around the ring or nestle them in small cupcake liners to keep them neat and portable.
Make Ahead and Storage
Storing Leftovers
To keep your Mini Mason Jar Lid Strawberry Pies fresh, store them in an airtight container at room temperature for up to two days. If you want to keep their texture perfect, avoid refrigerating as it can make the crust less crisp.
Freezing
If you want to enjoy these pies later, they freeze beautifully. After baking and cooling completely, wrap each pie individually in plastic wrap and place them in a freezer-safe bag. They can stay frozen for up to 2 months. When ready to eat, thaw at room temperature for a few hours and refresh in the oven for a few minutes.
Reheating
To reheat your Mini Mason Jar Lid Strawberry Pies, preheat your oven to 325 degrees Fahrenheit and warm for about 5-7 minutes. This will revive the flakiness of the crust and gently warm the strawberry filling without drying it out.
FAQs
Can I use other fruit jams besides strawberry?
Absolutely! While strawberry jam is the classic choice for these pies, you can easily swap in raspberry, blueberry, or even apricot jam to mix things up. Just choose a jam with a consistency that will hold up well during baking.
What if I don’t have mini mason jar lids, can I use something else?
If you don’t have mini mason jar lids, try using small tart pans, muffin tins, or even mini ramekins to shape your pies. Just adjust the dough and filling quantities accordingly to fit the size.
Is it necessary to chill the dough for 2-3 hours?
Chilling the dough is important because it solidifies the butter again after mixing, which helps the crust stay flaky and prevents shrinking during baking. If short on time, you can chill for at least 1 hour, but longer is better.
Can these pies be made vegan or dairy-free?
Yes! You can substitute the butter with a vegan butter alternative and use a non-dairy cream to brush the tops. Just ensure your jam is free from gelatin or other animal products.
What’s the best way to ensure the lattice doesn’t break when transferring?
Use a thin metal spatula or an offset spatula to carefully lift your woven lattice. If it feels fragile, chilling the lattice briefly before cutting and transferring can help firm it up.
Final Thoughts
There’s something so joyful about making and sharing Mini Mason Jar Lid Strawberry Pies. Their tiny size, sweet strawberry heart, and flaky homemade crust create a delightful dessert that’s both fun to make and impossible to resist. Whether for a party, a gift, or simply a sweet treat to brighten your day, these pies bring smiles with every bite. Give this recipe a try—you’ll quickly see why Mini Mason Jar Lid Strawberry Pies have become a treasured favorite in my kitchen!
PrintMini Mason Jar Lid Strawberry Pies Recipe

These Mini Mason Jar Lid Strawberry Pies are delightful bite-sized desserts featuring a buttery, flaky crust filled with sweet strawberry jam and topped with a beautifully woven lattice crust. Perfect for parties or a charming homemade treat, these pies bake quickly and showcase a creative use of mason jar lids for shaping.
- Prep Time: 20 minutes (plus 2-3 hours chilling)
- Cook Time: 13-15 minutes
- Total Time: 2 hours 35 minutes
- Yield: 18 mini pies 1x
- Category: Dessert
- Method: Baking
- Cuisine: American
- Diet: Vegetarian
Ingredients
For the Crust
- 1 cup (2 sticks) salted butter, cubed and chilled
- 1/4 cup granulated sugar
- 2 2/3 cups all-purpose flour
- 1/4 cup ice cold water
For the Filling and Topping
- 18 tablespoons (a little more than a cup) strawberry jam, jelly, or preserves
- 1 tablespoon heavy cream
- 1 tablespoon sparkling sugar
Instructions
- Prepare the Crust: Place chilled, cubed butter, sugar, and flour in a food processor and pulse until the mixture resembles coarse crumbs. Gradually add the ice cold water while processing until a dough forms, adjusting the water quantity as needed. Remove the dough onto plastic wrap, knead gently to bring it together, shape into a disk, and chill it in the refrigerator for at least 2 to 3 hours.
- Roll Out the Dough: When ready to bake, let the chilled dough sit out at room temperature for 15 to 20 minutes. Roll it out on a well-floured surface, sprinkling more flour as needed to prevent sticking.
- Preheat Oven and Prepare Baking Sheet: Heat the oven to 400°F (200°C). Arrange 9 mason jar lids on a baking sheet, spaced out evenly.
- Cut Dough Circles: Use a small mason jar ring (not the wide-mouth) to cut 18 circles from the dough. Roll each circle out slightly larger and press them into the jar lids, allowing dough to come up the sides to form mini pie shells.
- Fill the Pies: Spoon about one tablespoon of strawberry jam into each dough-lined jar lid, spreading evenly but not overfilling.
- Create Lattice Tops: Gather remaining dough, roll into a rectangle, and cut six strips measuring 1/2 inch by 3 inches each. Weave these strips into a lattice pattern, then cut out circles matching the mason jar rings. Carefully transfer each lattice circle using a metal spatula and place it over the filling on each pie.
- Brush and Sprinkle: Brush the lattice tops with heavy cream and sprinkle generously with sparkling sugar to add shine and sweetness.
- Bake: Bake the pies in the preheated oven for 13 to 15 minutes, or until the lattice tops begin to brown lightly.
- Cool and Remove Rings: Allow the pies to cool for 5 to 10 minutes in the rings, then gently press from the bottom to lift off the mason jar rings and lids without damaging the pies.
Notes
- Make sure the butter and water remain cold to achieve the flakiest crust.
- If the dough becomes too sticky, chill it again briefly before rolling out.
- You can substitute strawberry jam with other fruit preserves for different flavors.
- Use sparkling sugar for a crunchy, decorative finish or substitute with coarse sugar if unavailable.
- These pies are best enjoyed the day they are baked but can be refrigerated for up to 2 days.
Nutrition
- Serving Size: 1 mini pie
- Calories: 180 kcal
- Sugar: 12 g
- Sodium: 90 mg
- Fat: 10 g
- Saturated Fat: 6 g
- Unsaturated Fat: 3 g
- Trans Fat: 0.2 g
- Carbohydrates: 22 g
- Fiber: 1 g
- Protein: 2 g
- Cholesterol: 25 mg
Keywords: mini pies, strawberry pie, mason jar pies, lattice pie, bite-size dessert, strawberry jam dessert


