
How to Make Peach Jam With Beginning Canning Tutorial Recipe
If you want to capture the sweet, sun-kissed flavors of summer and learn a new kitchen skill, How to Make Peach Jam With Beginning Canning Tutorial is the perfect introduction to the magical world of homemade preserves. You’ll create a jam that bursts with fresh peach flavor, has a gorgeous amber color, and comes together with just a handful of simple ingredients and a few easy steps. This recipe not only guides you through making richly textured jam, but also gently walks you through the canning process, ensuring that the taste of summer stays with you all year long.
Ingredients You’ll Need
Trust me, the beauty of this recipe lies in how straightforward the ingredient list is—every item has a purpose and brings something special to the table, whether it’s the tartness, the texture, or the that sunshiny peach color we all love. Here’s what you’ll need to make this jam the star of every breakfast and dessert.
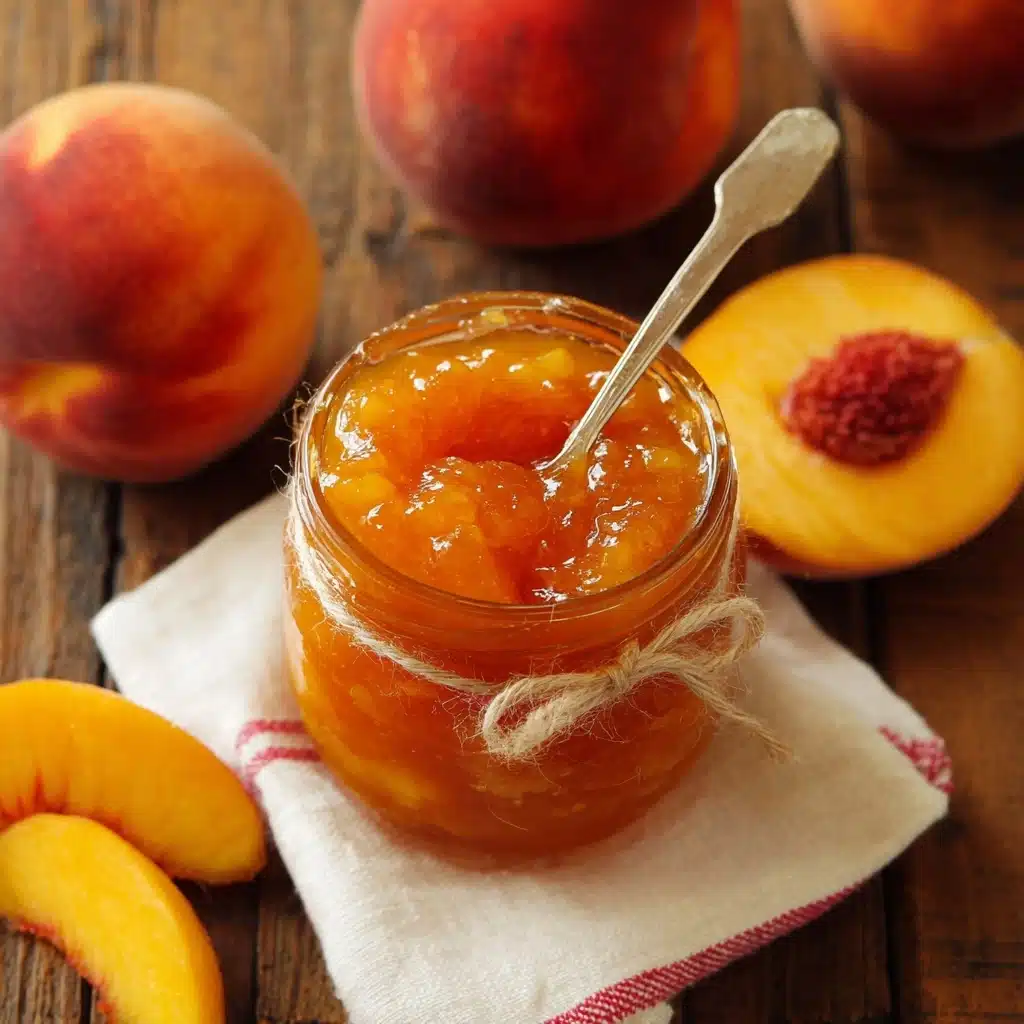
- Peaches (7 cups, chopped, about 4 lbs): Use ripe, fragrant peaches for the most vibrant flavor and lovely golden color—these are truly the heart of the jam.
- Lemon Juice (5 tablespoons): Adds brightness and helps preserve both the color and freshness of your jam.
- Butter (1 tablespoon): Just a small pat cuts down any foaming, keeping your jam smooth and glossy.
- Powdered Pectin (7 1/2 tablespoons, Ball brand RealFruit classic recommended): This ensures your jam will set perfectly every time, creating that irresistible spreadable texture.
- Sugar (5 cups granulated): Brings sweetness, preserves the jam, and highlights the juicy flavor of the peaches without overpowering them.
How to Make How to Make Peach Jam With Beginning Canning Tutorial
Step 1: Prepare the Jars and Peaches
Gather your equipment and wash your jars thoroughly in hot, soapy water—cleanliness is key to safe canning! Fill your water bath canner about halfway with water and have it ready on the side, so you’re not scrambling later. If you’re nervous about checking if your jam is set, pop a metal spoon in the freezer right now; the cold trick is a game-changer. Next comes blanching: dip those gorgeous peaches in boiling water for just 30 to 45 seconds, then immediately plunge them into an ice bath. Their skins will slip right off, making prep so much easier and faster!
Step 2: Chop and Sweeten the Peaches
Peel your just-blanched peaches, remove the pits, and chop the flesh into medium-small chunks. As you go, stir in 1 cup of the sugar—this little trick keeps your peaches from browning and helps coax out their best flavor. If you have a vegetable chopper like the Vidalia Chop Wizard, now’s the time to use it for perfectly even pieces (I swear by it!). The texture at this stage will set the tone for your final jam—chunky or smooth, you choose your own adventure!
Step 3: Make the Jam Mixture
Set aside the pectin in a small bowl and the rest of your sugar in another. Add your prepared peaches, lemon juice, and butter to a large, heavy-bottomed pot over medium-high heat. For consistency, you can mash them up with a potato masher or hit the pot with an immersion blender—just blend until it’s as smooth or chunky as your heart desires. I love leaving some peach pieces for a rustic, homemade feel. Meanwhile, start heating your water bath canner so it’s ready to boil when everything else is set.
Step 4: Add the Pectin and Cook
With your fruit bubbling, slowly sprinkle in the pectin, stirring constantly so it dissolves smoothly into the mixture. Once that’s mixed in, bring everything to a full, rollicking boil. Now, add in all the remaining sugar at once, stirring thoroughly—it’ll look thin, but don’t panic! Let the jam return to a boil and keep it there for just a minute while stirring constantly. You want a vigorous, rolling boil that can’t be stirred down. The jam will still look loose, but don’t worry—it sets up as it cools.
Step 5: Test the Jam for Doneness
Time to pull out that frozen spoon! Dip the cold spoon into your hot jam, then swipe your finger through the jam on the back of the spoon. The line should hold; this gives you a preview of the finished texture. If it’s still runny, give it another half-minute and check again. This little test ensures your jam will be perfectly spreadable, not runny and not too stiff.
Step 6: Jar and Process the Jam
Using a canning funnel, ladle the hot jam into pint or half-pint jars, leaving about 1/4 to 1/2 inch of space at the top (headspace matters for a good seal). Wipe the rims of each jar with a clean, damp towel—any sticky bits can prevent sealing. Secure the lids and rings, then carefully place the jars in your boiling water bath canner. Make sure the water covers your jars by at least two inches; this is what guarantees safety and shelf life. Process at a full boil for at least 10 minutes, timing carefully. If you live at a higher altitude, add extra time: 5 minutes for 1,001–3,000 feet, 10 for 3,001–6,000, 15 for 6,001–8,000, and so on.
Step 7: Cool and Store
When the timer rings, carefully remove the jars with tongs and set them on a towel. Listen for the satisfying “pop” as the jars seal—it’s music to a canner’s ears! Don’t poke or prod the lids. Let the jars cool undisturbed. If any didn’t seal after cooling, you can refrigerate them and use first or reprocess. Once sealed, store your precious How to Make Peach Jam With Beginning Canning Tutorial jars out of direct sunlight and enjoy, knowing your jam is safe for up to two years!
How to Serve How to Make Peach Jam With Beginning Canning Tutorial
Garnishes
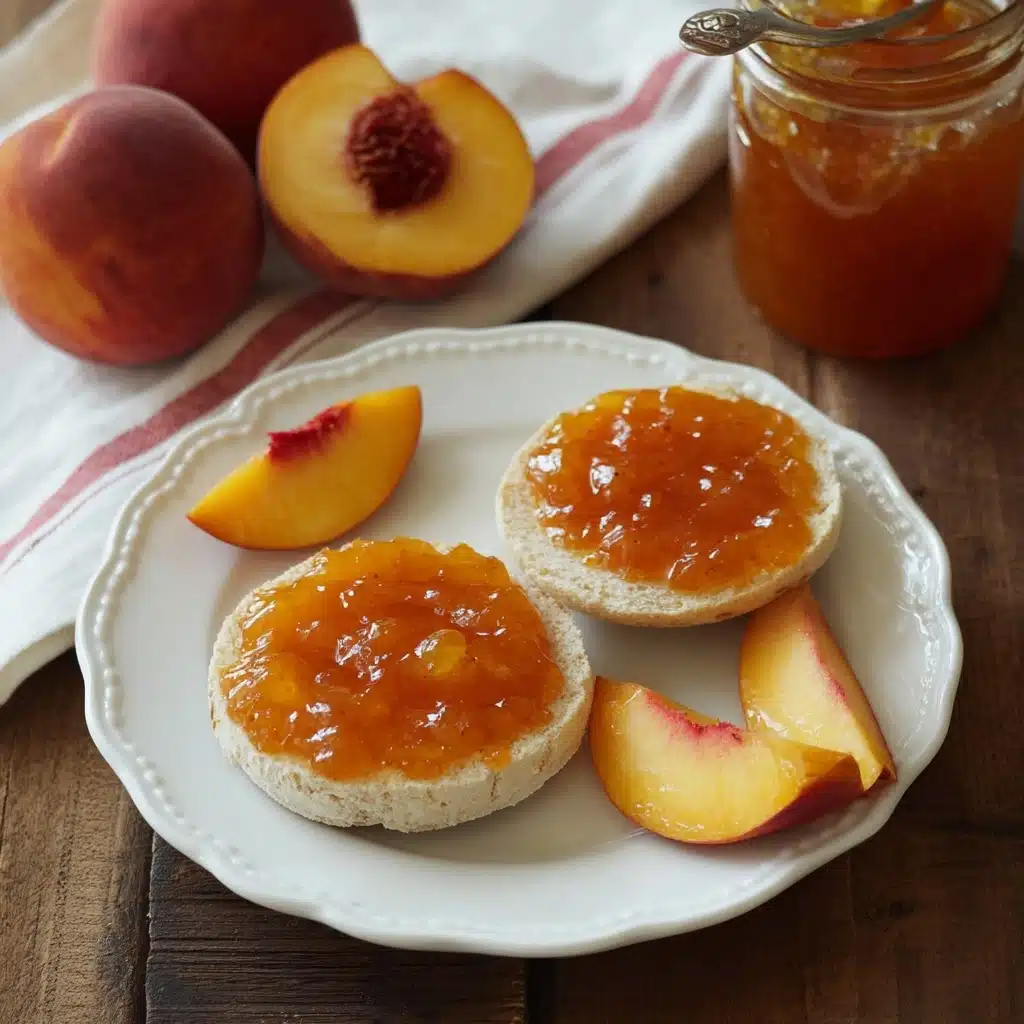
An extra spoonful of How to Make Peach Jam With Beginning Canning Tutorial can elevate just about any breakfast or dessert—swirl it onto yogurt and top with fresh mint, or add a dollop to pancakes with a sprinkle of powdered sugar for color and flavor. A few toasted almond slivers on top add texture and a hint of elegance.
Side Dishes
This jam shines alongside warm, buttered toast, flaky biscuits, or as a sweet counterpoint to a sharp cheese platter. Try it with creamy ricotta on sourdough or even as a glaze over roasted chicken for a sweet-savory twist that always impresses guests.
Creative Ways to Present
Gift a cute jar of How to Make Peach Jam With Beginning Canning Tutorial with a handwritten tag—it’s a heartfelt treat for friends and family. Or swirl it into vanilla ice cream, fold it into coffee cake batter, or use it as a surprise filling in thumbprint cookies. However you share it, the summery color and luscious flavor steal the show.
Make Ahead and Storage
Storing Leftovers
Once opened, keep your jar of How to Make Peach Jam With Beginning Canning Tutorial in the refrigerator, where it will stay fresh for up to three weeks. Use a clean spoon every time and close your lids tightly to maintain that beautiful, homemade taste and texture.
Freezing
Packed in freezer-safe jars or plastic containers, this jam freezes wonderfully for up to a year. Just be sure to leave enough headspace in your container for expansion, and always thaw it gently overnight in the fridge for best results—it’ll taste like it was made yesterday!
Reheating
If your jam has thickened too much in the fridge, simply spoon the desired amount into a heatproof dish and warm it gently in the microwave for a few seconds, or set the jar in a bowl of warm water. Stir and watch it return to glorious, spreadable perfection for toast, baking, or brunch spreads.
FAQs
Can I use frozen peaches instead of fresh?
Absolutely! Thawed frozen peaches work beautifully in this recipe. Just be sure to drain any excess liquid and proceed with the same steps for chopping and sweetening. The color and flavor might be a touch different, but the jam will still be delicious.
What happens if my jars don’t seal after canning?
If you hear a pop from the lids within an hour of cooling, your jars are sealed! If any lids don’t seal, you can just pop that jar in the fridge and enjoy it first—or you can reprocess with a new lid to try sealing again. Always check for a good seal before storing at room temperature.
Do I have to use pectin?
Pectin makes the jam set up nice and firm, which is especially helpful for beginners. If you skip it, you’ll have a looser, more sauce-like jam—still tasty, just different in texture. For the classic, spreadable jam experience, using pectin is highly recommended.
What’s the best way to peel peaches?
Blanching peaches in boiling water for about 30 seconds, then moving them immediately to an ice bath, loosens the skins so they slip right off—no knives or frustration needed! Always use ripe, fragrant peaches for the sweetest, easiest peeling.
Can I adjust the sugar for a lower-sugar jam?
This recipe is carefully balanced for safe canning and ideal texture, so changing the amount of sugar can affect both the jam’s set and how well it keeps. If you’re interested in a lower-sugar version, look for a pectin specifically labeled for low-sugar recipes, and follow those instructions closely.
Final Thoughts
The joy of making your own How to Make Peach Jam With Beginning Canning Tutorial is truly about more than just the irresistible jar of summer you’ll tuck away in your pantry—it’s about learning a timeless kitchen craft and sharing that sweetness with the people you love. So roll up your sleeves, trust the process, and don’t be afraid to savor a spoonful (or two!) while you work. Happy canning, friends!
PrintHow to Make Peach Jam With Beginning Canning Tutorial Recipe

Learn how to make delicious peach jam with this easy recipe that includes a beginning canning tutorial. Perfect for preserving the flavors of ripe peaches to enjoy all year round.
- Prep Time: 30 minutes
- Cook Time: 20 minutes
- Total Time: 50 minutes
- Yield: 8 half-pint jars 1x
- Category: Preserves
- Method: Canning
- Cuisine: American
- Diet: Vegetarian
Ingredients
Jars and Peaches:
- 7 cups peaches, chopped (about 4lbs)
- 5 Tablespoons lemon juice
- 1 Tablespoon butter
Peach Jam:
- 7 1/2 Tablespoons powdered pectin (RealFruit classic pectin in Ball brand)
- 5 cups granulated sugar
Instructions
- Prepare the Jars and Peaches – Wash the jars and blanch peaches.
- Make the Peach Jam – Puree peaches, lemon juice, and butter. Boil pectin, sugar, and fruit mixture. Check jam consistency.
- Can the Jam – Fill jars, process in a water bath canner, and allow lids to seal.
Notes
- Ensure jars are properly sterilized before use.
- Adjust processing time based on altitude for safe canning.
- Store sealed jars in a cool, dark place for best preservation.
Nutrition
- Serving Size: 1 tablespoon
- Calories: 45
- Sugar: 9g
- Sodium: 10mg
- Fat: 0g
- Saturated Fat: 0g
- Unsaturated Fat: 0g
- Trans Fat: 0g
- Carbohydrates: 12g
- Fiber: 0g
- Protein: 0g
- Cholesterol: 0mg
Keywords: peach jam, canning, preserves, homemade jam, fruit preservation
