
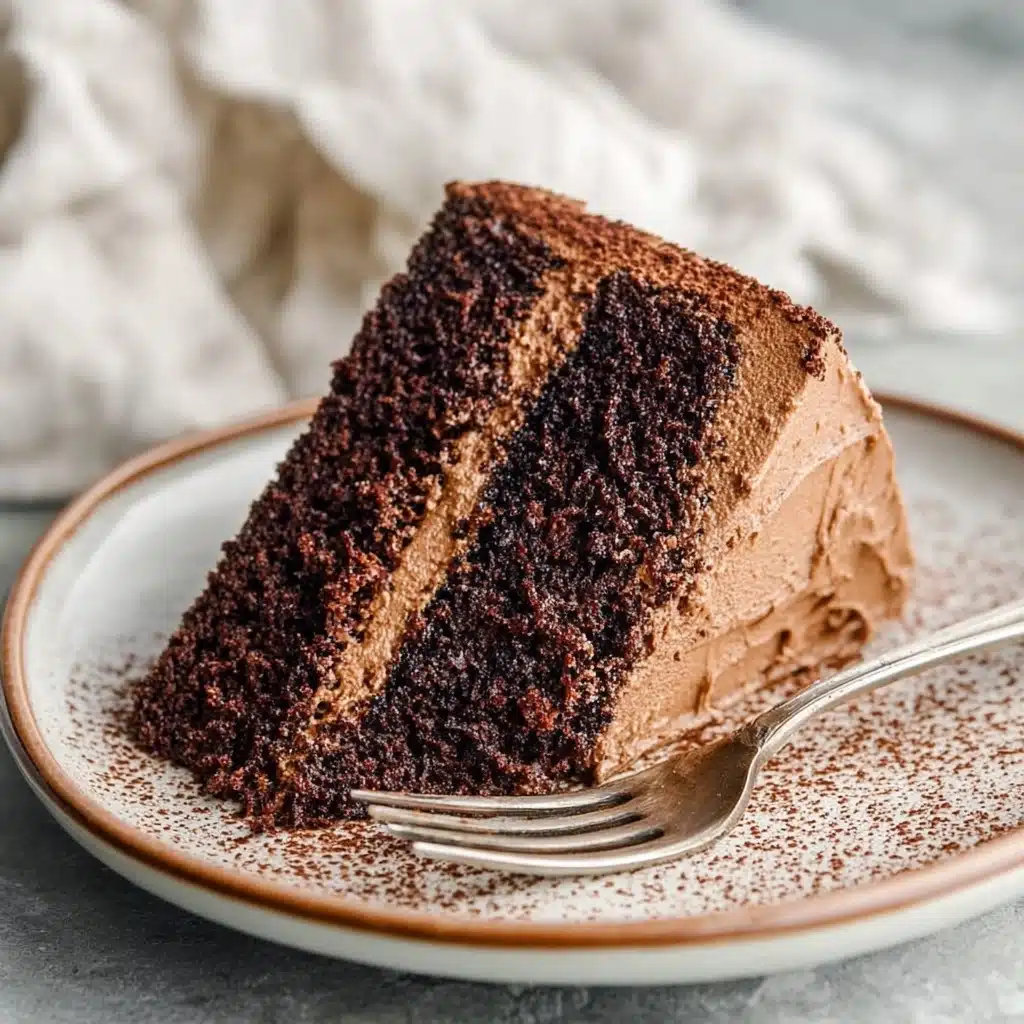
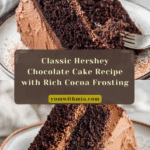
Hershey Chocolate Cake Recipe
If you are in the mood for a rich, moist, and utterly irresistible dessert, this Hershey Chocolate Cake will become your new absolute favorite. With each bite, you’ll experience the perfect harmony of deep cocoa flavor, tender crumb, and a luscious chocolate frosting that clings lovingly to every layer. This classic Hershey Chocolate Cake recipe is a beautiful celebration of simple ingredients coming together to create a show-stopping cake that’s as easy to make as it is to devour. Whether you’re baking for a special occasion or just treating yourself to a midweek indulgence, this cake never fails to impress.

Ingredients You’ll Need
Sometimes the simplest ingredients make the most decadent desserts. Each component of this Hershey Chocolate Cake plays a crucial role—from the rich cocoa powder that delivers that signature chocolate punch to the buttermilk that tenderizes the crumb and keeps the cake wonderfully moist.
- Granulated sugar: Sweetens the cake while helping to create a tender texture.
- All-purpose flour: Provides the structure needed to hold all the cake’s delicious layers together.
- Unsweetened cocoa powder: Adds the deep chocolate flavor that defines the Hershey Chocolate Cake experience.
- Baking powder and baking soda: Work together to give the cake a beautiful rise and light crumb.
- Salt: Enhances the chocolate taste, balancing sweetness perfectly.
- Large eggs (room temperature): Help bind the ingredients and contribute to the cake’s moistness.
- Buttermilk: Adds a subtle tang and tenderizes the crumb for a soft, melt-in-your-mouth texture.
- Vegetable or canola oil: Keeps the cake moist without adding unwanted flavors.
- Vanilla extract: Enhances the chocolate notes with its warm, fragrant essence.
- Boiling water or hot coffee: Intensifies the cocoa flavor while thinning the batter for an even bake.
- Melted butter: Brings richness to the frosting, making it satisfyingly creamy.
- Powdered sugar: Sweetens and thickens the frosting to a smooth, spreadable consistency.
- Milk: Helps achieve the perfect frosting texture—neither too thick nor too runny.
How to Make Hershey Chocolate Cake
Step 1: Prepare Your Baking Pans and Oven
Start by preheating your oven to 350°F (180°C). Line two 8-inch round cake pans with parchment paper and generously spray with non-stick cooking spray. This step ensures your beautiful cake layers come out cleanly, ready for frosting without any crumbly mishaps.
Step 2: Mix the Dry Ingredients
In a large bowl, whisk together the granulated sugar, all-purpose flour, unsweetened cocoa powder, baking powder, baking soda, and salt. This evenly distributes the leavening agents and ensures the cocoa is mixed thoroughly, forming the chocolate base that will give your cake that unmistakable Hershey Chocolate Cake flavor.
Step 3: Add Wet Ingredients and Combine
Next, add the eggs, buttermilk, oil, and vanilla extract to your dry mixture. Blend everything until it’s smooth and uniform in color. Then, slowly stir in the boiling water or hot coffee. Don’t be alarmed if the batter looks thin—that’s exactly how it’s supposed to be. This helps keep the cake incredibly moist and tender.
Step 4: Bake to Perfection
Pour the luscious batter evenly into your prepared pans and slide them into the oven. Bake for 30 to 35 minutes, or until a toothpick inserted into the center comes out clean. You’ll know your Hershey Chocolate Cake layers are perfectly baked when they spring back lightly to the touch and fill your kitchen with that irresistible chocolate aroma.
Step 5: Whip Up the Chocolate Frosting
While the cake cools, prepare the frosting by combining melted butter and unsweetened cocoa powder. Gradually add powdered sugar, milk, and vanilla extract, mixing for several minutes until the frosting is velvety smooth and fluffy. This frosting is the heavenly finishing touch that wraps the cake in rich, creamy chocolate goodness.
Step 6: Assemble Your Cake
Place one cake layer on your serving plate and spread a generous layer of the luscious frosting on top. Add the second cake layer, then frost the top and sides with the remaining frosting. This step transforms your Hershey Chocolate Cake from delicious layers into a stunning dessert centerpiece ready to impress.
How to Serve Hershey Chocolate Cake
Garnishes
Enhance the beauty and flavor by adorning your Hershey Chocolate Cake with fresh berries like raspberries or strawberries, which add a touch of brightness. For added texture, sprinkle chopped nuts, chocolate shavings, or a light dusting of cocoa powder. It’s these little extras that make each slice feel like a special occasion.
Side Dishes
This cake pairs beautifully with a scoop of creamy vanilla ice cream or a dollop of freshly whipped cream to balance the richness. For an adult twist, serve alongside a glass of sweet red wine or a smooth cup of espresso to deepen the chocolate experience even further.
Creative Ways to Present
Slice your Hershey Chocolate Cake into elegant wedges and serve on a simple white plate to let the cake’s deep chocolate color shine. For parties, consider mini versions in cupcake form or create a layered trifle using cake chunks, frosting, and berries in a clear glass dish. These presentations elevate your dessert from everyday treat to unmistakable crowd-pleaser.
Make Ahead and Storage
Storing Leftovers
Leftover Hershey Chocolate Cake keeps wonderfully when stored in an airtight container at room temperature for up to two days. For longer keeping, refrigerate for up to five days. Bring the cake back to room temperature before serving to revive its tender crumb and creamy frosting.
Freezing
If you want to freeze your cake, wrap the cooled layers separately in plastic wrap and foil. Freeze for up to three months. When ready to enjoy, thaw the cake layers overnight in the refrigerator and then assemble or refrost as desired for a fresh-from-the-oven taste anytime you desire.
Reheating
To gently warm a slice of Hershey Chocolate Cake, microwave it on low power for 10 to 15 seconds, just enough to set the frosting and enhance that soft, moist texture. Avoid overheating to keep it from drying out or becoming too gooey.
FAQs
Can I substitute coffee for the boiling water in the cake?
Absolutely! Using hot coffee instead of boiling water amplifies the chocolate flavor in the Hershey Chocolate Cake, giving it a deeper, richer taste. However, if you prefer no caffeine, plain boiling water works just as well without altering the texture.
Is buttermilk necessary, or can I use regular milk?
Buttermilk’s acidity tenderizes the cake and helps activate the baking soda for better rise, making the crumb softer and more delicate. If you don’t have it on hand, you can make a buttermilk substitute by adding a tablespoon of lemon juice or vinegar to a cup of milk and letting it sit for 5 minutes.
How do I avoid the cake from drying out?
Moisture is key! Make sure to measure your flour carefully, do not overbake, and keep the frosting sealed over the cake to lock in moisture. Using oil instead of butter in the batter also contributes to a softer, more tender texture that stays moist longer.
Can I make this cake gluten-free?
Yes, with some adjustments. Use a 1:1 gluten-free flour blend that includes a binding agent such as xanthan gum. Keep in mind that the texture may be slightly different, but the wonderful Hershey Chocolate Cake flavor will still shine through.
What is the best way to get smooth frosting?
Patience and proper mixing are key. Start with softened butter and sift your cocoa powder and powdered sugar before adding to avoid lumps. Beat the frosting on medium speed for several minutes until it becomes creamy and fluffly—this ensures your frosting spreads easily and looks beautiful.
Final Thoughts
There’s something truly heartwarming about baking a Hershey Chocolate Cake from scratch and sharing every bite with those you love. This recipe is a timeless indulgence, balancing simplicity and decadence in the most satisfying way. I encourage you to give it a whirl and experience the joy of homemade chocolate cake that never fails to impress and comfort alike.
PrintHershey Chocolate Cake Recipe
This classic Hershey Chocolate Cake recipe delivers a rich, moist, and deeply chocolatey dessert that’s perfect for any celebration or satisfying your sweet craving. The combination of cocoa powder in both the cake and frosting provides an intense chocolate flavor, while the use of boiling water ensures a tender crumb. Topped with a creamy, smooth chocolate frosting, this cake is a timeless favorite for chocolate lovers.
- Prep Time: 15 minutes
- Cook Time: 35 minutes
- Total Time: 50 minutes
- Yield: 12 servings 1x
- Category: Dessert, Cake
- Method: Baking
- Cuisine: American
- Diet: Vegetarian
Ingredients
Dry Ingredients
- 2 cups granulated sugar (400g)
- 1 3/4 cups + 2 tablespoons all-purpose flour (235g)
- 3/4 cup unsweetened cocoa powder (64g)
- 1 1/2 teaspoons baking powder
- 1 1/2 teaspoons baking soda
- 1 teaspoon salt
Wet Ingredients
- 2 large eggs, room temperature
- 1 cup buttermilk (227g)
- 1/2 cup vegetable or canola oil (99g)
- 2 teaspoons vanilla extract
- 1 cup boiling water or hot coffee (237g)
Chocolate Frosting
- 1/2 cup melted butter (113g)
- 2/3 cup unsweetened cocoa powder (57g)
- 3 cups powdered sugar (360g)
- 1/3 cup milk (83g)
- 1 teaspoon vanilla extract
Instructions
- Preheat the Oven: Set your oven to 350°F (180°C). Prepare two 8-inch round baking pans by lining them with parchment paper and spraying lightly with non-stick cooking spray. This ensures easy cake removal later.
- Combine Dry Ingredients: In a large bowl, stir together the granulated sugar, all-purpose flour, cocoa powder, baking powder, baking soda, and salt until well mixed. This forms the base of your cake batter.
- Add Wet Ingredients: Mix in the eggs, buttermilk, vegetable or canola oil, and vanilla extract with the dry ingredients until the batter is smooth and well combined.
- Incorporate Boiling Water: Carefully stir in the boiling water or hot coffee to the batter. The batter will be thin, which is normal and ensures a moist final cake. Pour the batter evenly into the prepared pans.
- Bake the Cake: Place the pans in the preheated oven and bake for 30 to 35 minutes. The cake is done when a toothpick inserted in the center comes out clean. Remove from oven and let cool in pans for about 10 minutes before transferring to a wire rack to cool completely.
- Prepare the Chocolate Frosting: In a medium bowl, combine melted butter and cocoa powder. Gradually add powdered sugar, milk, and vanilla extract, mixing for several minutes until the frosting is smooth, fluffy, and spreadable.
- Assemble the Cake: Place one cooled cake layer on your serving tray. Spread a generous amount of frosting on top. Add the second cake layer over it, then frost the top and sides of the entire cake with the remaining frosting. Slice and serve.
Notes
- Room temperature eggs and buttermilk help create a smoother batter and better texture.
- Using boiling water enhances the cocoa flavor and keeps the cake moist.
- If preferred, substitute hot coffee for boiling water for a richer chocolate flavor.
- Make sure to let the cake layers cool completely before frosting to avoid melting the frosting.
- You can store leftover cake covered at room temperature for up to 3 days or refrigerate for up to a week.
- For a gluten-free version, replace the all-purpose flour with a gluten-free flour blend designed for baking.
Nutrition
- Serving Size: 1 slice (1/12 of cake)
- Calories: 420 kcal
- Sugar: 35 g
- Sodium: 320 mg
- Fat: 20 g
- Saturated Fat: 6 g
- Unsaturated Fat: 12 g
- Trans Fat: 0 g
- Carbohydrates: 58 g
- Fiber: 4 g
- Protein: 5 g
- Cholesterol: 45 mg
Keywords: Hershey chocolate cake, chocolate cake recipe, moist chocolate cake, chocolate frosting, classic chocolate cake


