
Easy Homemade Uncrustables (Freezeable!) Recipe
Calling all lunchbox lovers and meal-prep enthusiasts! These Easy Homemade Uncrustables (Freezeable!) are the secret to making every school or work lunch feel like a treat while saving you time and money. Pillowy-soft bread, creamy peanut butter, and sweet swirls of your favorite jelly get perfectly sealed inside a crustless pocket—ready to eat fresh or straight from the freezer. This recipe transforms a simple classic into a homemade hero, perfect for last-minute lunches or snack attacks.
Ingredients You’ll Need
The magic of Easy Homemade Uncrustables (Freezeable!) is in their simplicity. Each ingredient plays a crucial role, from classic sandwich bread to your personalized choice of fillings. Here’s what you’ll need and why each is needed for that perfect, portable bite:
- Sandwich bread (8 slices): Choose your favorite—white, wheat, or multigrain. Soft bread works best for sealing the edges and keeping everything tender.
- Peanut butter (1/2 cup): Creamy or chunky, pick what you love! Peanut butter is both the flavor star and the glue that keeps the filling inside.
- Jelly or preserves (1/4 cup): Whether you crave grape jelly, classic strawberry, or an adventurous fruit spread, this is where you can get creative.
How to Make Easy Homemade Uncrustables (Freezeable!)
Step 1: Make the Sandwiches
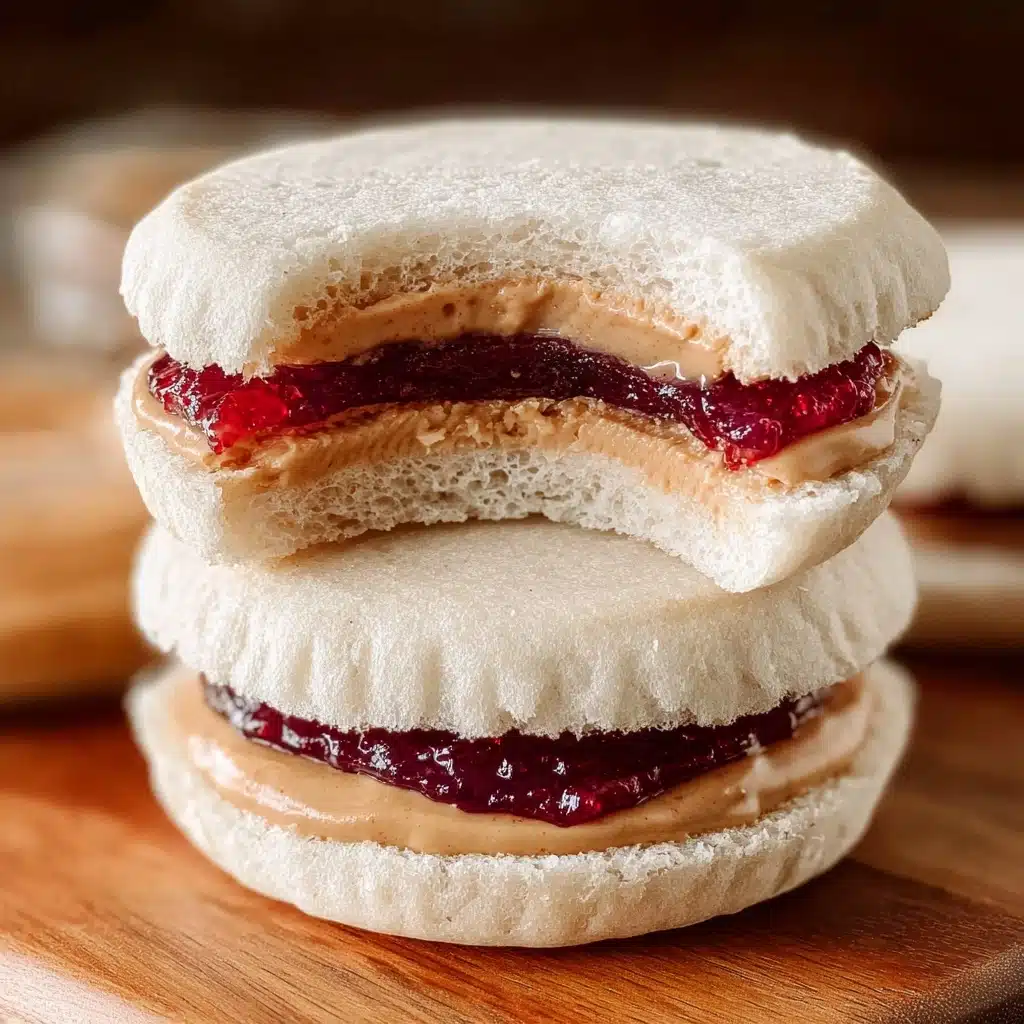
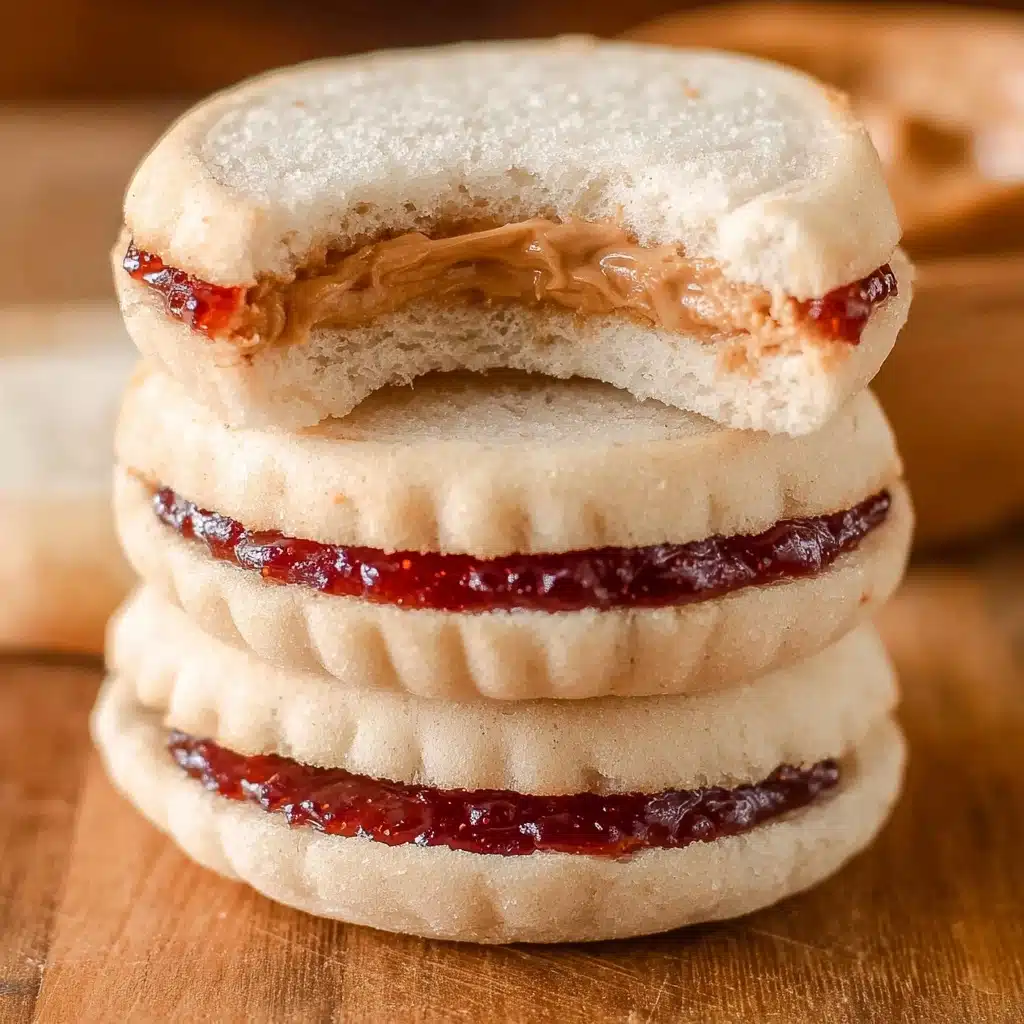
Lay out half of your bread slices on a clean surface. Generously spread peanut butter onto the center of each slice but avoid going all the way to the edges—this makes sealing much easier later. Top the peanut butter with a dollop of jelly or preserves, keeping it right in the middle for the best flavor punch with every bite. Cap each with another slice of bread to create a neat sandwich stack.
Step 2: Seal & Remove the Crusts
Now for the fun part! Take your sandwich cutter and place it right in the center of each assembled sandwich. Press the sealer down firmly and hold for 15 to 30 seconds, letting the edges fuse together and form that signature sealed edge. Gently remove the crusts from around the outside, then lift the sealer. You’ll be left with adorable, crustless pockets that look (and taste!) just like the store-bought classic, only better and fresher.
Step 3: Freeze for Later
If you’re prepping for the week or just want a stash ready to grab, line a baking sheet with parchment paper and space your Easy Homemade Uncrustables (Freezeable!) out without overlapping. Freeze until solid, then transfer to a large zip-top bag, or, for ultra convenience, slip each into its own sandwich bag. They’ll keep beautifully in the freezer and thaw quickly when packed for lunch.
Step 4: Pack for Lunch
When you’re ready to enjoy, just grab a frozen uncrustable and place it in the main compartment of a lunch box. As it sits, it’ll thaw to pillowy perfection by lunchtime. Toss in fruit, veggies, or a treat on the side, and you’ve got a balanced, fun meal that everyone will be excited to unpack.
How to Serve Easy Homemade Uncrustables (Freezeable!)
Garnishes
Bring a little flair to your Easy Homemade Uncrustables (Freezeable!) with fun touches. A dusting of powdered sugar, a drizzle of honey, or even a light brush of melted butter can make these handheld snacks extra special for little ones or grown-ups alike.
Side Dishes
For a well-rounded meal, pair your uncrustables with crisp apple slices, carrot sticks, or a handful of pretzels. For a heartier lunch, try a side of yogurt or a small salad. These sandwiches fit in perfectly with almost any lunchbox lineup.
Creative Ways to Present
Get playful with presentation! Stack Easy Homemade Uncrustables (Freezeable!) on a platter for parties, cut them into shapes with assorted cutters for themed lunches, or serve alongside a dip like chocolate or yogurt for a party-worthy snack spread.
Make Ahead and Storage
Storing Leftovers
If you have a few leftover Easy Homemade Uncrustables (Freezeable!), slip them into a sealed container or zip-top bag and keep them in the fridge. They’ll stay soft and tasty for up to two days, ready for a quick snack.
Freezing
For true grab-and-go convenience, freezing is the way to go. After making your batch, freeze them in a single layer on a baking sheet, then store in an airtight zip bag. They’ll keep fresh for up to two months, making lunch packing a breeze.
Reheating
Most of the time, these sandwiches are best enjoyed at room temperature. If you prefer them warm, just pop one in the microwave on a plate for 10 to 15 seconds—enough to soften the bread and get the peanut butter perfectly melty. Always check they’re not too hot before serving to kids!
FAQs
Can I use other nut butters in Easy Homemade Uncrustables (Freezeable!)?
Absolutely! Almond butter, cashew butter, SunButter, or any favorite spread all work beautifully. Just be sure to use one that’s not too runny, so your sandwiches seal well.
What bread works best for homemade uncrustables?
Soft, fresh sandwich bread creates the best seal and texture. Avoid rustic or crusty bread, which is harder to seal and can tear more easily.
How long do Easy Homemade Uncrustables (Freezeable!) last in the freezer?
Stored properly in an airtight bag, these sandwiches keep their flavor and texture for up to two months. Perfect for stocking up!
Is it okay to use different types of jelly or preserves?
Definitely! Mix and match flavors like raspberry, peach, or blueberry, or even use chocolate spread or apple butter for a fun twist.
How do I keep the filling from leaking out when sealing?
Keep your fillings near the center of the bread and avoid overfilling. This leaves enough bread around the edges to seal tightly with the sandwich cutter.
Final Thoughts
With how easy, customizable, and downright delicious they are, it’s hard not to fall in love with Easy Homemade Uncrustables (Freezeable!). Making a homemade batch means you control the flavors and the fun—all while keeping your freezer stocked for busy days. Give them a try for your next lunch or snack and see just how much happier, and easier, mealtime can be!
PrintEasy Homemade Uncrustables (Freezeable!) Recipe

Learn how to make easy homemade Uncrustables that you can freeze for later, perfect for quick and convenient snacks or lunches.
- Prep Time: 10 minutes
- Cook Time: 0 minutes
- Total Time: 10 minutes
- Yield: 4 servings 1x
- Category: Snack, Lunch
- Method: Freezing, Sealing
- Cuisine: American
- Diet: Vegetarian
Ingredients
Bread:
- 8 slices sandwich bread (your favorite)
Peanut Butter:
- 1/2 cup peanut butter (smooth or chunky)
Jelly or Preserves:
- 1/4 cup jelly or preserves (your favorite)
Instructions
- Make the sandwiches: Spread the peanut butter on half of the bread slices, keeping most of it in the center. Top it with jelly, keeping it in the middle of the sandwich, and top it with another bread slice to close the sandwich. Make as many as needed.
- Seal & remove the crusts: Place the sandwich cutter in the middle of the sandwich. Push the sealer down and hold it to seal for 15 to 30 seconds. Remove the crusts from around the sealer and then lift the sealer.
- Freeze for later: If making a lot, place them on a parchment-lined baking sheet and freeze. Once frozen, transfer them into a large zip bag and keep them frozen. Or, place each uncrustable inside a sandwich size zip bag and freeze individually.
- Pack for lunch: Pack the frozen uncrustable inside the main compartment of a lunch box. Add any sides, like fruit and veggies, in separate compartments or containers. If the uncrustable is inside a zip bag, just add it directly inside the lunch bag.
Nutrition
- Serving Size: 1 Uncrustable
- Calories: 320
- Sugar: 12g
- Sodium: 380mg
- Fat: 17g
- Saturated Fat: 3.5g
- Unsaturated Fat: 11g
- Trans Fat: 0g
- Carbohydrates: 36g
- Fiber: 2g
- Protein: 10g
- Cholesterol: 0mg
Keywords: Uncrustables, Homemade Snack, Freezable Lunch, Peanut Butter and Jelly Sandwich


