
Easy Gluten-Free Waffles Recipe
Introduction
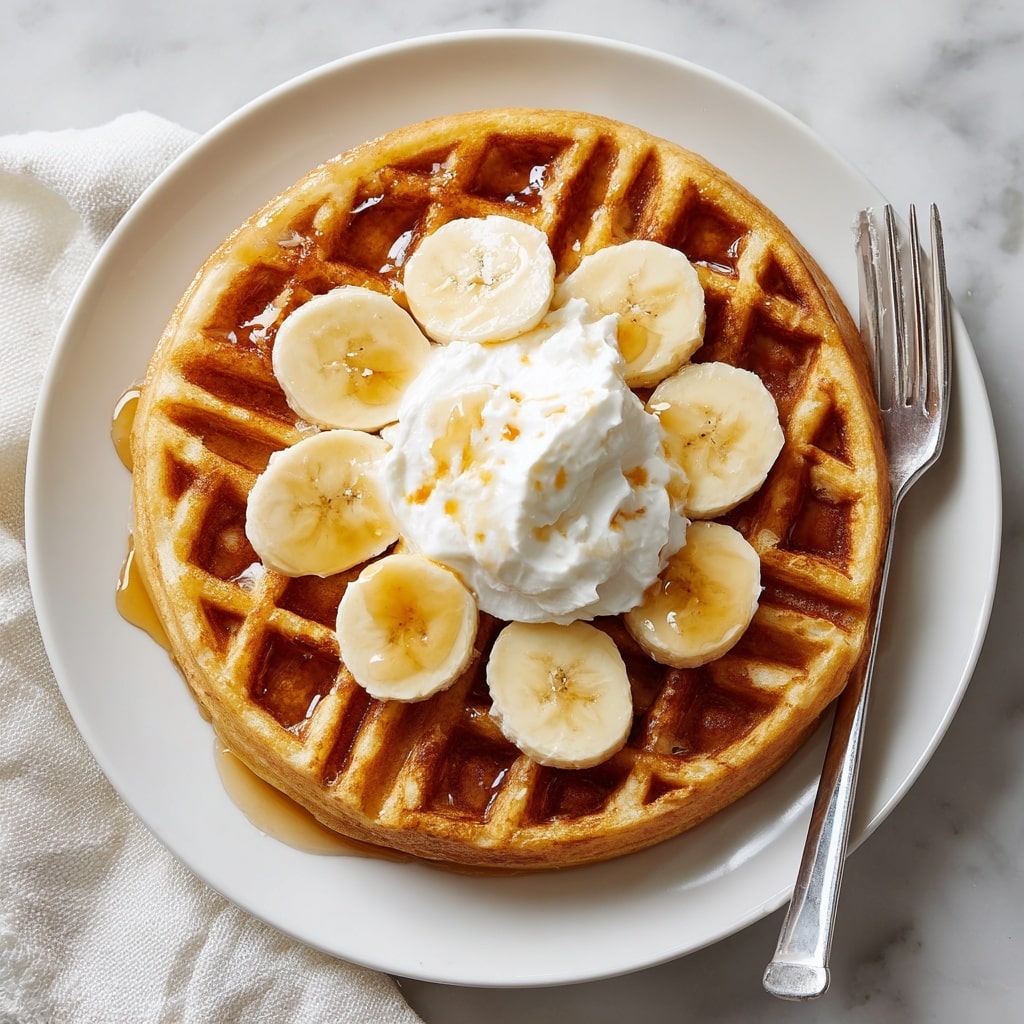
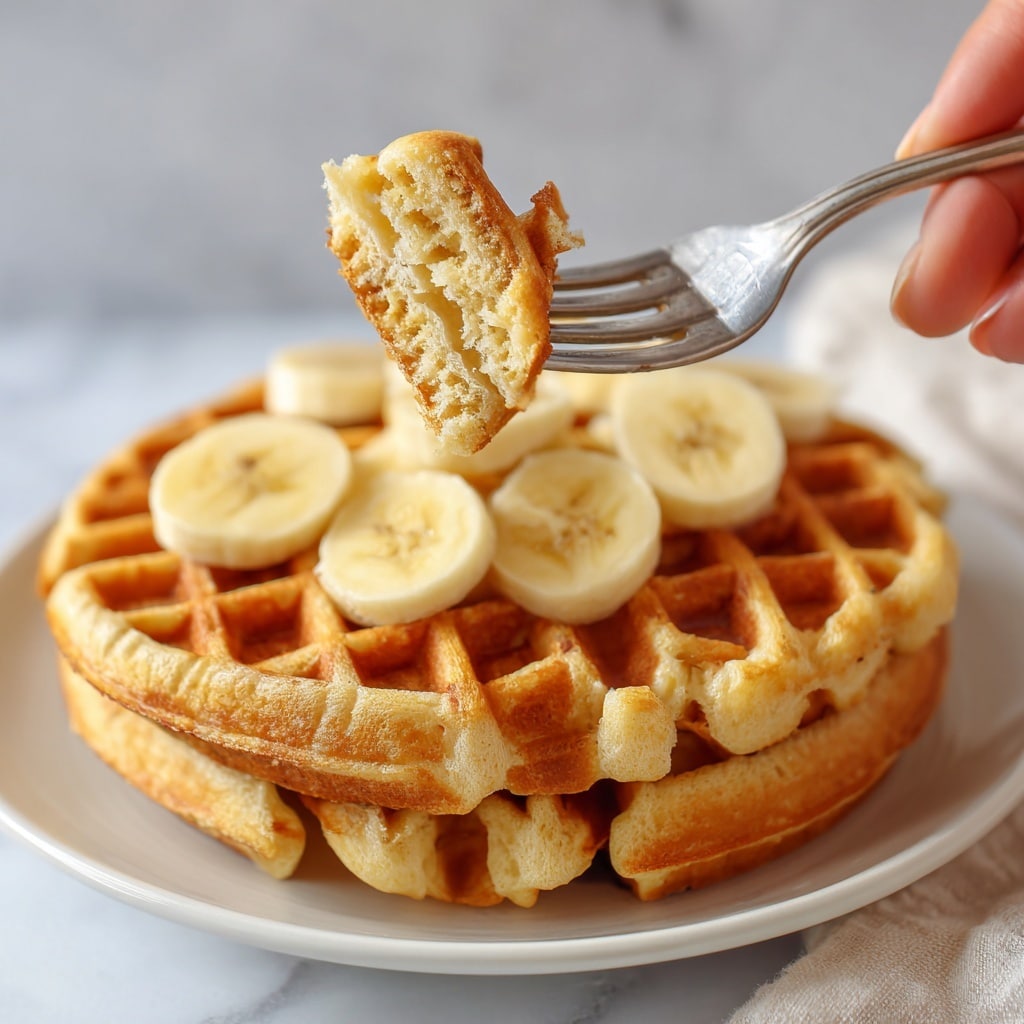
These easy gluten free waffles are light, fluffy, and perfect for a delicious breakfast or brunch. Made with a simple blend of ingredients, they come together quickly and offer a crisp, golden exterior with a tender inside. Whether you’re gluten sensitive or just trying something new, these waffles are sure to please.
Ingredients
- 240 g (2 cups) plain gluten free flour blend
- 50 g (¼ cup) caster or granulated sugar
- 4 tsp baking powder
- ½ tsp xanthan gum (omit if your flour blend already contains it)
- ¼ tsp salt
- 160 g (⅔ cup) whole milk, room temperature
- 115 g (½ cup) full-fat plain or Greek-style yoghurt, room temperature
- 50 g (3½ tbsp) oil (olive, sunflower, or vegetable oil)
- 2 large eggs (US large/UK medium), room temperature
- ½ tsp vanilla bean paste or 1 tsp vanilla extract
Instructions
- Step 1: In a large bowl, whisk together the gluten free flour blend, sugar, baking powder, xanthan gum, and salt until evenly combined.
- Step 2: Add the milk, yoghurt, oil, eggs, and vanilla to the dry ingredients. Whisk well until you get a smooth batter without flour clumps. The batter should be similar in consistency to American-style pancake batter. If too thick, add about 1 tablespoon (15 g) of extra milk to loosen.
- Step 3: Let the batter rest on the counter for 10 minutes while you preheat your waffle maker.
- Step 4: Preheat your waffle maker to the highest heat setting or as per your model’s instructions. If using a non-stick waffle maker, no greasing is needed; otherwise, lightly brush with oil or spray with cooking spray.
- Step 5: Pour the batter into the preheated waffle maker. Amount depends on waffle size; for a 6¾-inch (17 cm) waffle maker, use about ⅔ to ¾ cup of batter. Use slightly less if unsure to avoid overflow.
- Step 6: Cook the waffle until golden brown and crispy, usually about 5 minutes on maximum heat. Cooking time may vary depending on your waffle maker.
- Step 7: Transfer the cooked waffle to a wire rack to keep crisp. Repeat with remaining batter. This recipe yields about 4 large waffles.
- Step 8: Serve waffles warm with your favorite toppings and enjoy immediately for the best texture.
Tips & Variations
- If your gluten free flour blend already contains xanthan gum, omit adding extra to avoid a gummy texture.
- For dairy-free options, substitute milk and yoghurt with almond or oat milk and coconut yoghurt.
- Experiment with flavor by adding cinnamon, nutmeg, or a handful of chocolate chips to the batter.
- Use a digital scale for best measurement accuracy, especially with gluten free flours.
Storage
Store leftover waffles in an airtight container in the refrigerator for up to 3 days. Reheat them in a toaster or oven to regain crispness before serving. Avoid microwaving as this can make them soggy.
How to Serve
Serve this delicious recipe with your favorite sides.
FAQs
Can I use regular flour instead of gluten free flour?
Yes, you can substitute with all-purpose flour if you don’t need the waffles to be gluten free. Use the same quantity and reduce or omit xanthan gum as it’s not necessary with regular flour.
Why should the batter rest before cooking?
Resting allows the baking powder to activate and the flour to absorb moisture, resulting in lighter, fluffier waffles with better texture.
PrintEasy Gluten-Free Waffles Recipe
Delicious and easy gluten free waffles made with a simple batter of gluten free flour, milk, yoghurt, and eggs. These waffles are crispy on the outside and soft on the inside, perfect for a cozy breakfast or brunch. The recipe is adaptable with common pantry ingredients and suitable for those avoiding gluten.
- Prep Time: 15 minutes
- Cook Time: 20 minutes
- Total Time: 35 minutes
- Yield: 4 large waffles (6¾ inch/17 cm diameter each) 1x
- Category: Breakfast
- Method: Waffle Iron Cooking
- Cuisine: American
- Diet: Gluten Free
Ingredients
Dry Ingredients
- 240 g (2 cups) plain gluten free flour blend (e.g. Doves Farm Freee gluten free plain white flour without xanthan gum)
- 50 g (¼ cup) caster/superfine or granulated sugar
- 4 tsp baking powder
- ½ tsp xanthan gum (omit if your flour blend already contains xanthan gum)
- ¼ tsp salt
Wet Ingredients
- 160 g (⅔ cup) whole milk, room temperature
- 115 g (½ cup) full-fat plain or Greek-style yoghurt, room temperature
- 50 g (3½ tbsp) oil, such as olive, sunflower or vegetable oil
- 2 US large/UK medium eggs, room temperature
- ½ tsp vanilla bean paste or 1 tsp vanilla extract
Instructions
- Mix dry ingredients: In a large bowl, whisk together the gluten free flour blend, sugar, baking powder, xanthan gum, and salt until well combined.
- Add wet ingredients: Add the milk, yoghurt, oil, eggs, and vanilla to the dry ingredients. Whisk thoroughly until the batter is smooth with no lumps. The batter should have a consistency similar to American-style pancake batter. If it is too thick, add up to 15g (1 tablespoon) extra milk to loosen.
- Rest the batter: Let the batter rest at room temperature for 10 minutes while you preheat the waffle maker. This helps improve texture and consistency.
- Preheat waffle maker: Turn on your waffle maker and set it to the highest or medium-high heat setting. Adjust according to your machine’s behavior. Do not grease if using a non-stick waffle maker, otherwise lightly coat with oil, butter, or cooking spray.
- Cook waffles: Pour about ⅔ to ¾ cup of batter into the preheated waffle maker, adjusting the amount based on the size of your waffle maker. Close the lid and cook for about 5 minutes or until the waffle is golden brown and crispy. Avoid overfilling to prevent batter from leaking out.
- Remove and cool: Transfer cooked waffles to a wire rack to keep crisp. Repeat the process with remaining batter. Yield depends on waffle size; about 4 large waffles (6¾ inches/17 cm diameter) can be made.
- Serve and store: Serve waffles hot or warm with your choice of toppings. Leftovers can be stored in an airtight container in the refrigerator for up to 3 days and reheated in a toaster or oven to restore crispness.
Notes
- If your gluten free flour blend already contains xanthan gum, omit the added xanthan gum.
- Resting the batter helps improve waffle texture but can be skipped if short on time.
- Adjust milk quantity if batter is too thick to ensure a smooth pouring consistency.
- A non-stick waffle maker typically does not require greasing, but others might benefit from a light oil or butter coating.
- Waffles are best eaten immediately for optimal crispness as they soften when cooled.
- Reheating waffles in a toaster or oven helps restore their crisp exterior.
Keywords: gluten free waffles, easy waffles, breakfast waffles, gluten free breakfast, crispy waffles


