Easy Homemade Dill Pickles Recipe
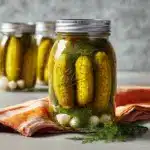
This recipe for Easy Homemade Dill Pickles guides you through making classic crunchy pickles with fresh cucumbers, garlic, dill, and a perfectly balanced pickling brine. The method includes sterilizing jars, preparing a flavorful brine with vinegar, salt, sugar, and bay leaves, and processing the jars to ensure proper preservation. These tangy, garlicky dill pickles are perfect for snacking or adding zest to your favorite dishes.
- Prep Time: 30 minutes
- Cook Time: 25 minutes
- Total Time: 55 minutes
- Yield: About 6-7 quart jars (approximately 7-8 liters of pickles) 1x
- Category: Pickles and Preserves
- Method: Boiling Water Bath Canning
- Cuisine: American
- Diet: Halal
Ingredients
Scale
Pickling Brine
- 12 cups (3,000 ml) water (cold or lukewarm)
- 2 cups (500 ml) distilled white vinegar (5% or 6% acidity)
- 2/3 cup (200 g) fine salt
- 1/2 cup + 1 tablespoon (115 g) granulated sugar
- 5 bay leaves
Pickles
- 12 pounds cucumbers (approximately), well rinsed with ends trimmed
- 16 garlic cloves (2 per jar)
- Fresh dill, 2-3 twigs per jar
- 1/2 tablespoon peppercorns (approximately 5 per jar)
Instructions
- Sterilize Jars: Wash all jars and lids with warm soapy water. Submerge lids in boiling water for 4-5 minutes, then carefully pat dry with paper towels. Preheat the oven to 215°F (about 102°C) and place jars upside down on oven racks. Dry jars in the oven for 20 minutes or until completely dry to ensure sterility.
- Make Pickling Brine: In a large pot, combine water, distilled white vinegar, granulated sugar, fine salt, and bay leaves. Bring the mixture to a boil over medium heat, then reduce to low and let it simmer for 5 minutes. Remove from heat, ensure sugar and salt are dissolved, discard bay leaves, and let the brine rest for 10 minutes to cool slightly.
- Fill Jars: Wash cucumbers thoroughly and trim off both ends. Place 2-3 twigs of fresh dill, 2 garlic cloves, and about 5 peppercorns into the bottom of each sterilized jar. Tightly pack the jars with cucumbers. Slowly pour the warm pickling brine over the cucumbers until it reaches just below the rim, leaving approximately 1/2 inch of headspace. Cover jars loosely with lids but do not seal tightly yet.
- Process the Jars: Line the bottom of a large pot with a kitchen towel or microfiber towel if you don’t have a rack. This prevents jars from cracking during heat processing. Place the packed jars upright into the pot and fill with warm water until it reaches approximately 2 inches below the jar rims. Cover the pot with a lid, bring the water to a boil over medium-high heat, then reduce the heat to low and let the jars boil for about 15 minutes or until the cucumbers turn a light green color.
- Seal the Jars: Using a jar lifter, carefully remove each jar from the boiling water. Immediately seal them tightly with lids using a kitchen towel or heat-safe mitt to protect your hands. Flip each jar upside down and cover them with bath towels or blankets to insulate as they cool. Let jars sit undisturbed at room temperature for 12 to 24 hours. Hearing a popping sound indicates that jars have sealed properly. Store your homemade dill pickles in a cool, dark place for best results.
Notes
- Use fresh firm cucumbers, preferably pickling cucumbers, for the best crunch.
- Ensure jars and lids are properly sterilized to avoid spoilage during storage.
- Adjust vinegar acidity if you use a different brand; 5-6% acidity is ideal for safe pickling.
- If you prefer spicier pickles, consider adding red pepper flakes or mustard seeds to each jar.
- Store sealed pickles in a cool, dark place and refrigerate after opening.
- Allow pickles to sit for at least 1-2 weeks to develop full flavor before consuming.
Nutrition
- Serving Size: 1/4 cup (about 35g)
- Calories: 10
- Sugar: 1.5 g
- Sodium: 450 mg
- Fat: 0 g
- Saturated Fat: 0 g
- Unsaturated Fat: 0 g
- Trans Fat: 0 g
- Carbohydrates: 3 g
- Fiber: 1 g
- Protein: 0.3 g
- Cholesterol: 0 mg
Keywords: dill pickles, homemade pickles, fermented cucumbers, easy pickle recipe, canning, preserved cucumbers, garlicky pickles
Find it online: https://yumwithmia.com/easy-homemade-dill-pickles-recipe/
