
Pierogies and Kielbasa Recipe
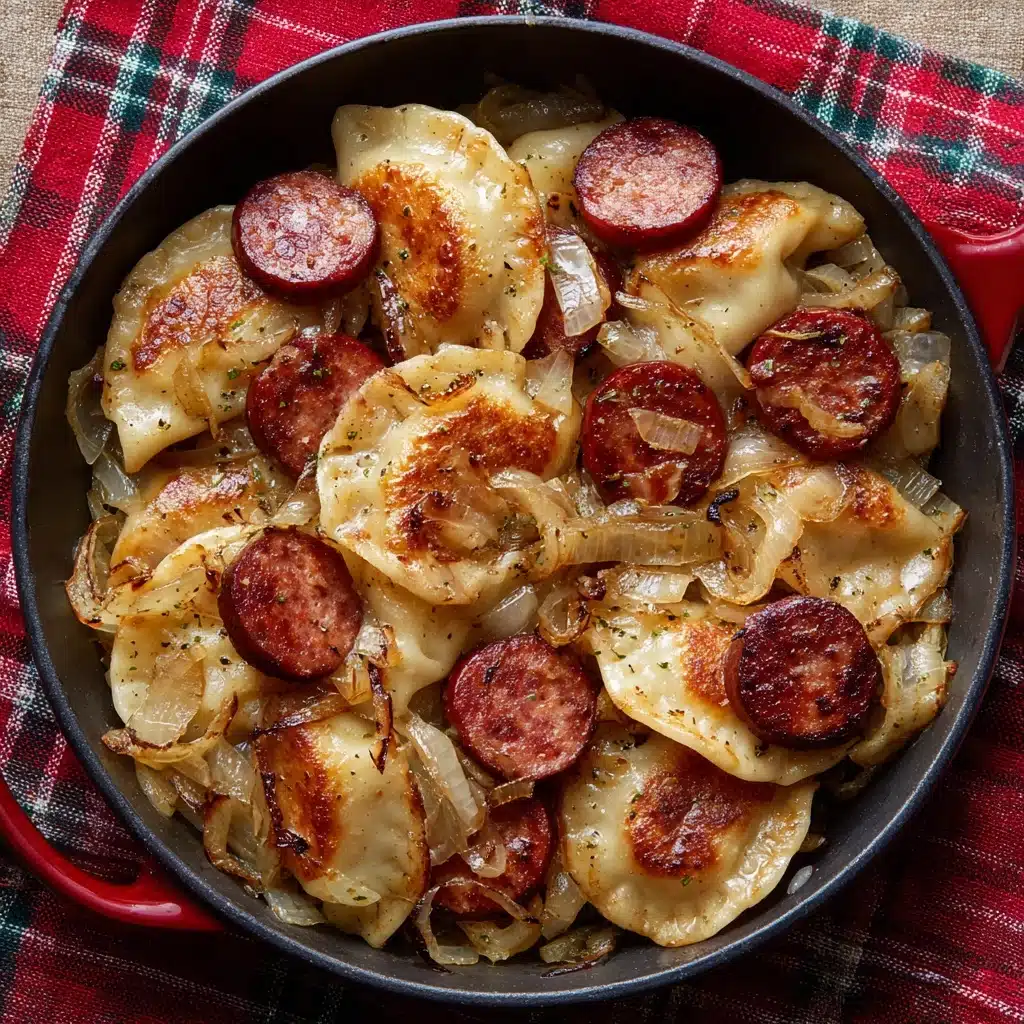
Few comfort food duos can beat the savory satisfaction of Pierogies and Kielbasa. This beloved meal is the kind of dish that gathers people around the table and sparks instant conversation; every bite offers melt-in-your-mouth pierogies wrapped in a buttery embrace, accompanied by smoky, sizzling kielbasa. Whether you crave a quick weeknight dinner or need something heartwarming for a family gathering, Pierogies and Kielbasa promises flavor, ease, and plenty of cozy nostalgia in every forkful.
Ingredients You’ll Need
One of the best things about Pierogies and Kielbasa is how effortlessly impressive it tastes, thanks to a handful of simple but purposeful ingredients. Each component shines: smoky kielbasa, tender pierogies, and golden onions all mingle together in a swirl of butter. Keep these staples close and you’ll have a crowd-pleasing meal ready anytime.
- Butter (5 tablespoons): Adds a rich creaminess and helps brown the kielbasa and onions beautifully.
- Kielbasa (1 pound, thinly sliced): The signature smoky sausage carries loads of flavor and stands up perfectly to the hearty pierogies.
- Mini Pierogies (25 pieces): Bite-sized pillows filled with potato or cheese, they soak up all that buttery goodness.
- Onion (1 medium, coarsely chopped): Brings a sweet, caramelized note and extra depth to the dish.
How to Make Pierogies and Kielbasa
Step 1: Cook the Pierogies
Start by preparing your pierogies according to the package instructions. For most brands, this means plunging them into a pot of rapidly boiling water and letting them cook for about 3 minutes, just until they float. Once they’re tender, drain and set aside. You’ll want to work quickly so the pierogies don’t stick together as they cool!
Step 2: Brown the Kielbasa
Heat 2 tablespoons of butter in a large skillet set over medium-high heat. Add your thinly sliced kielbasa and let it sizzle, turning often, until each slice develops a deeply browned edge and irresistible aroma. Remove the browned kielbasa and set aside on a plate—you’ll use the same pan for even more flavor in the next steps.
Step 3: Sauté the Onions
Drop the remaining 3 tablespoons of butter into your skillet. Toss in those coarsely chopped onions and sauté, stirring often, until they turn soft and golden. That sweetness adds life to the dish, making every forkful pop with flavor.
Step 4: Combine Everything
Now for the fun part: return the cooked pierogies and browned kielbasa to the skillet with the sautéed onions. Stir gently until everything is deliciously coated in butter and warmed through. The pierogies will pick up a little color, the kielbasa will mingle with the sweet onions, and it’ll smell like pure comfort. Serve warm and dig in—the magic of Pierogies and Kielbasa is ready for your table!
How to Serve Pierogies and Kielbasa

Garnishes
Add some final flair to your platter of Pierogies and Kielbasa. Chopped fresh parsley or dill offers a pop of color and brightness; a dollop of sour cream on the side gives that perfect creamy tang. Want something extra? A sprinkle of chives or a few grinds of black pepper never goes amiss.
Side Dishes
This dish stands strong on its own, but a crisp green salad or a medley of roasted vegetables makes for a vibrant plate. For traditional vibes, serve alongside tangy sauerkraut or red cabbage. Crusty bread is also welcome for sopping up every buttery bite.
Creative Ways to Present
Turn Pierogies and Kielbasa into a fun, family-style board with small bowls of mixed pickles, assorted mustards, or even a cheese dip for extra decadence. If you’re hosting, serve in a cast iron skillet or a colorful platter to show off those golden pierogies and glistening kielbasa slices.
Make Ahead and Storage
Storing Leftovers
Leftover Pierogies and Kielbasa keep beautifully. Simply let the dish cool to room temperature, then transfer it to an airtight container. It’ll stay fresh in the fridge for up to 3 days, making it a brilliant meal prep option.
Freezing
You can absolutely freeze prepared Pierogies and Kielbasa. Let everything cool completely before stashing in a freezer-safe bag or container. Label and freeze for up to one month—the texture of the pierogies and richness of the kielbasa will hold up well when you’re ready to enjoy again.
Reheating
For best results, reheat Pierogies and Kielbasa in a hot skillet with a bit of extra butter. Stir occasionally until hot and gently crisp. The microwave is quick for busy weeknights, but the stovetop keeps the edges nicely browned and flavorful.
FAQs
Can I use frozen pierogies instead of fresh?
Absolutely! Most grocery stores stock frozen mini pierogies, and they work wonderfully here. Just cook according to package instructions before adding to your skillet.
What’s the best way to slice the kielbasa?
Slice the kielbasa at a slight diagonal or into coins—it increases surface area for more browning and gives a beautiful presentation.
Do I have to use mini pierogies, or can large ones work?
Go ahead and use full-size pierogies if that’s what you have on hand! The flavor remains the same, but mini versions are perfect for scooping up bites with kielbasa and onions.
Can I add vegetables to Pierogies and Kielbasa?
Definitely! Bell peppers, baby spinach, or sautéed mushrooms pair effortlessly. Add them along with the onions for extra color and nutrition.
Is there a vegetarian option for this dish?
Simply swap out the kielbasa for plant-based sausage and use your favorite vegetarian pierogies. The buttery onions and rich flavors make it satisfying for everyone.
Final Thoughts
If you’re looking for a meal that blends simplicity, comfort, and flavor, Pierogies and Kielbasa are sure to become a favorite at your table. Give it a whirl, mix and match with your favorite sides, and enjoy every buttery bite—there’s a reason this cozy combo is a classic! Don’t wait for a special occasion; sometimes, the best memories are made with warm plates and even warmer company.
PrintPierogies and Kielbasa Recipe

A comforting and hearty dish featuring pierogies, Kielbasa, and caramelized onions sautéed to perfection in butter. This quick and easy recipe is perfect for a satisfying weeknight meal.
- Prep Time: 10 minutes
- Cook Time: 20 minutes
- Total Time: 30 minutes
- Yield: 4 servings 1x
- Category: Main Course
- Method: Sauté, Boil
- Cuisine: Polish
- Diet: Non-Vegetarian
Ingredients
For Pierogies:
- 25 mini Pierogies
For Kielbasa:
- 1 pound Kielbasa (thinly sliced)
Additional:
- 5 tablespoons butter
- 1 medium onion (coarsely chopped)
Instructions
- Cook Pierogies: Cook the pierogies according to package directions by boiling them for 3 minutes. Drain and set aside.
- Sear Kielbasa: In a skillet, brown the thinly sliced Kielbasa in 2 tablespoons of butter over medium-high heat. Set aside once browned.
- Caramelize Onions: In another skillet, sauté the chopped onions in 3 tablespoons of butter until tender.
- Combine: Add the cooked Pierogies and Kielbasa to the skillet with the onions. Toss together until well coated and heated through.
- Serve: Serve the Pierogies and Kielbasa warm and enjoy!
Nutrition
- Serving Size: 1 serving
- Calories: 480
- Sugar: 2g
- Sodium: 1100mg
- Fat: 34g
- Saturated Fat: 15g
- Unsaturated Fat: 16g
- Trans Fat: 0g
- Carbohydrates: 30g
- Fiber: 2g
- Protein: 14g
- Cholesterol: 80mg
Keywords: Pierogies, Kielbasa, Polish, Main Course, Comfort Food

