
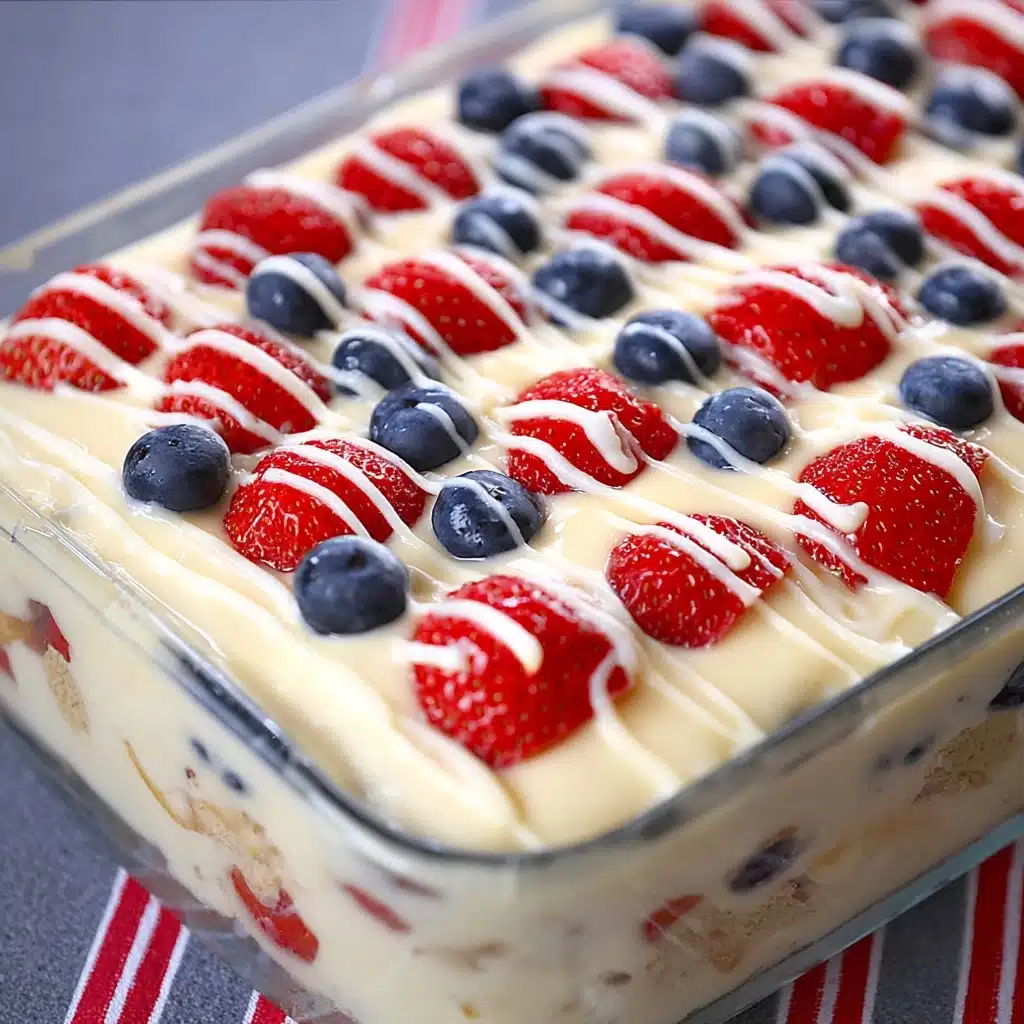
No Bake Summer Berry Icebox Cake Recipe
If you’re yearning for a truly effortless yet spectacular dessert, the No Bake Summer Berry Icebox Cake should be at the very top of your list. With its dreamy layers of luscious cream, juicy berries, and softened graham crackers, this treat perfectly captures the taste of summer without ever needing to turn on the oven. Each bite brings the tart freshness of berries, the sweet richness of vanilla pudding, and a delightful hint of white chocolate, all melded together in a cool, creamy cake that’s as beautiful as it is delicious. Whether you’re hosting a backyard barbecue or just craving something sweet on a hot day, this cake is a guaranteed crowd-pleaser.

Ingredients You’ll Need
One of my favorite things about this recipe is how it transforms a handful of humble ingredients into something magical. Each component brings its own touch—crunch, creaminess, or bursts of color—and skipping even one would change the whole experience.
- Graham crackers: The sturdy, slightly sweet backbone that creates irresistible cake-like layers once softened.
- Cream cheese (8 oz, softened): Adds a rich tang and smooth texture to balance the dessert’s sweetness.
- Vanilla Instant Pudding (two 3.4 oz packages): Infuses the filling with creamy vanilla flavor and helps everything set up nicely.
- Cold milk (2 1/2 cups): Brings the pudding to life and keeps the filling light and fluffy.
- Cool Whip or whipped cream (12 oz, reserve 1/2 cup): The finishing touch for billowy layers and cloud-like texture throughout the cake.
- Fresh strawberries (3 cups, sliced): Juicy, sweet, and perfect for beautiful, vibrant layers.
- Fresh blueberries (1 1/2 cups): Add pops of color and a blueberry burst in every bite.
- White chocolate chips (2 oz): For that pretty and delicious drizzle on top—melts easily for a silky, sweet finish.
How to Make No Bake Summer Berry Icebox Cake
Step 1: Make the Creamy Filling
Start by beating the softened cream cheese and vanilla instant pudding mixes together in a large bowl. Use an electric mixer for best results, aiming for a blended, velvety mix without any lumps. This is the dreamy base that will soak into your graham crackers and keep everything indulgently creamy.
Step 2: Add the Milk Gradually
Slowly pour in the cold milk, beating constantly. At first, the mixture may look a little thick, but as you add more milk, it will start to resemble a fluffier, almost mousse-like filling. This gradual mixing is the secret to a silky smooth texture.
Step 3: Fold in the Whipped Cream
Carefully fold in 11 1/2 ounces of Cool Whip (or homemade whipped cream), setting 1/2 cup aside for later. This makes the filling extra light and makes every bite feel like a spoonful of clouds. Be gentle—you want to keep all that lovely air in the mixture!
Step 4: Prepare the First Layer
Spread a thin layer of reserved Cool Whip on the bottom of a 9×13-inch pan. This little trick helps the first layer of graham crackers stick and begin their transformation into “cake.”
Step 5: Layer the Graham Crackers
Lay out five graham crackers across the center of the pan, then break two more as needed to cover the edges. Don’t worry if they break—just patch everything together for complete coverage.
Step 6: Layer Filling and Berries
Spread a hearty layer of the creamy filling over the crackers, then scatter a mix of sliced strawberries and blueberries on top. The berries soak into the creamy mixture, creating fresh, vibrant layers all the way through.
Step 7: Repeat the Magic—Twice More!
Continue layering graham crackers, filling, and berries. Repeat this sequence two more times (for a total of three delicious layers), aiming to finish right at the top of the pan with plenty of berries for a show-stopping finish.
Step 8: Chill to Perfection
Cover your assembled cake and refrigerate for at least four hours, or even better, overnight. This step lets the graham crackers perfectly soften and absorb all the creamy, fruity flavors. The wait is worth every second!
Step 9: White Chocolate Drizzle
Right before serving, melt your white chocolate chips according to the package instructions. Drizzle the melted chocolate generously over the berries. For easy drizzling, use a spoon or pour the melted chocolate into a zip-top bag, snip a tiny corner, and pipe it over for a gorgeous bakery look.
How to Serve No Bake Summer Berry Icebox Cake
Garnishes
I love to scatter a handful of extra fresh berries and a light dusting of powdered sugar for an elegant finish. Mint sprigs add a burst of green that makes the colors pop and brings a refreshing touch to every slice.
Side Dishes
Since the No Bake Summer Berry Icebox Cake is creamy and sweet, it pairs beautifully with a bright, tangy fruit salad or a glass of chilled lemonade. If you’re serving this at a party, simple tea sandwiches or cheese platters make a festive, balanced spread.
Creative Ways to Present
This cake wows in a classic rectangular pan, but you can also build it in glass trifle bowls, individual mason jars, or even parfait glasses for single-servings. Mini versions are perfect for grab-and-go picnics or summer birthday parties!
Make Ahead and Storage
Storing Leftovers
Leftover No Bake Summer Berry Icebox Cake can be covered and kept refrigerated for up to three days. The flavors only deepen, and the texture stays beautifully creamy as long as you keep it well wrapped.
Freezing
For longer storage, pop the cake in the freezer—either the whole cake or individual slices. Wrap tightly in plastic wrap and then foil. Thaw overnight in the fridge before serving; the cake remains creamy, with berries that hold their pop of flavor.
Reheating
No reheating is needed for this cool delight—simply slice and serve! In fact, the chilled temperature is part of what makes the No Bake Summer Berry Icebox Cake so refreshing and perfect for hot days.
FAQs
Can I use frozen berries for this cake?
You can use frozen berries in a pinch, but be sure to thaw and drain them well before layering to prevent excess moisture from making the cake soggy.
What can I use instead of graham crackers?
If you’re out of graham crackers, vanilla wafer cookies or digestive biscuits are delicious substitutes and will soften just like grahams as the cake chills.
Can I make this cake dairy-free?
Absolutely! Swap in dairy-free cream cheese, plant-based pudding, dairy-free whipped topping, and a non-dairy milk to make a version everyone can enjoy.
Is it possible to make this dessert ahead for a party?
Definitely! The No Bake Summer Berry Icebox Cake actually improves as it sits, so making it the day before your event means less stress and even better flavor.
How do I cut the cake neatly?
For sharp, tidy slices, use a large, sharp knife dipped in hot water (wipe between cuts). This helps glide through those soft, creamy layers without making a mess!
Final Thoughts
There’s nothing quite as satisfying as sharing a cool, creamy slice of No Bake Summer Berry Icebox Cake with those you love. Whether you serve it for a special gathering or just as a simple sweet treat on a sunny day, it’s bound to become a favorite that everyone requests again and again. I can’t wait for you to try it and taste just how perfect summer can be!
PrintNo Bake Summer Berry Icebox Cake Recipe

This No Bake Summer Berry Icebox Cake is a refreshing and easy-to-make dessert that’s perfect for hot summer days. Layers of graham crackers, creamy pudding, and fresh berries create a delightful treat for any occasion.
- Prep Time: 20 minutes
- Cook Time: 0 minutes
- Total Time: 4 hours 20 minutes
- Yield: 12 servings 1x
- Category: Dessert
- Method: No-Bake
- Cuisine: American
- Diet: Vegetarian
Ingredients
Graham Cracker Layers:
- 19 oz graham crackers
Pudding Mixture:
- 8 oz cream cheese, softened
- 2 (3.4 oz) packages Vanilla Instant Pudding
- 2–1/2 cups cold milk
- 12 oz Cool Whip or homemade whipped cream
Fruit Layers:
- 3 cups fresh strawberries, sliced
- 1–1/2 cups fresh blueberries
- 2 oz white chocolate chips
Instructions
- Beat cream cheese and dry pudding mixes: In a large bowl, beat the cream cheese and dry pudding mixes with a mixer until blended.
- Gradually beat in milk: Slowly add the milk to the cream cheese and pudding mixture while continuing to beat.
- Stir in Cool Whip: Gently fold in the Cool Whip or homemade whipped cream, reserving ½ cup for topping.
- Layer graham crackers: Spread a thin layer of Cool Whip in a 9×13 pan. Place a layer of graham crackers on top.
- Add pudding mixture and fruit: Layer pudding mixture, blueberries, and sliced strawberries over the graham crackers.
- Repeat layers: Continue layering graham crackers, pudding mixture, and berries, ending with a final layer of graham crackers on top.
- Refrigerate: Chill the cake for at least 4 hours or overnight to allow the graham crackers to soften.
- Drizzle with white chocolate: Melt white chocolate chips and drizzle over the top of the cake before serving.
Nutrition
- Serving Size: 1 slice
- Calories: 320
- Sugar: 20g
- Sodium: 380mg
- Fat: 12g
- Saturated Fat: 7g
- Unsaturated Fat: 4g
- Trans Fat: 0g
- Carbohydrates: 50g
- Fiber: 2g
- Protein: 4g
- Cholesterol: 30mg
Keywords: No Bake, Icebox Cake, Summer Dessert, Berry Cake
